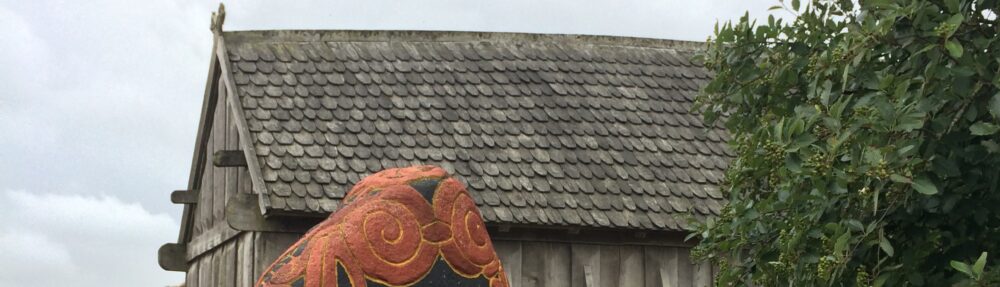
A new and rather spectacular find was announced recently on social networks and the belarussian media. This helmet may be a modern fake, deposited in order to create resale value, but it might well be authentic.
The findplace
The helmet was found on the shore of the river Березины (Berezina River) in the town of Бобруйске (Babruysk) in Belarus. A local worker for the waterways company found it washed ashore after the winter ice cleared off. In 2018, said the local man, work was undertaken to widen and deepen the river, and maybe the helmet was accidentally uncovered during the work.
The findplace of Babruysk has history spanning back to the Stone Age, and during the times of Vladimir the Great, a village was on the river bank of Berezina River.
The helmet
These are some pictures posted by Аляксей Бацюкоў, a historian at the Historical Museum in Mogilev, Belarus, who shared an enthusiastic account of the find on social media.
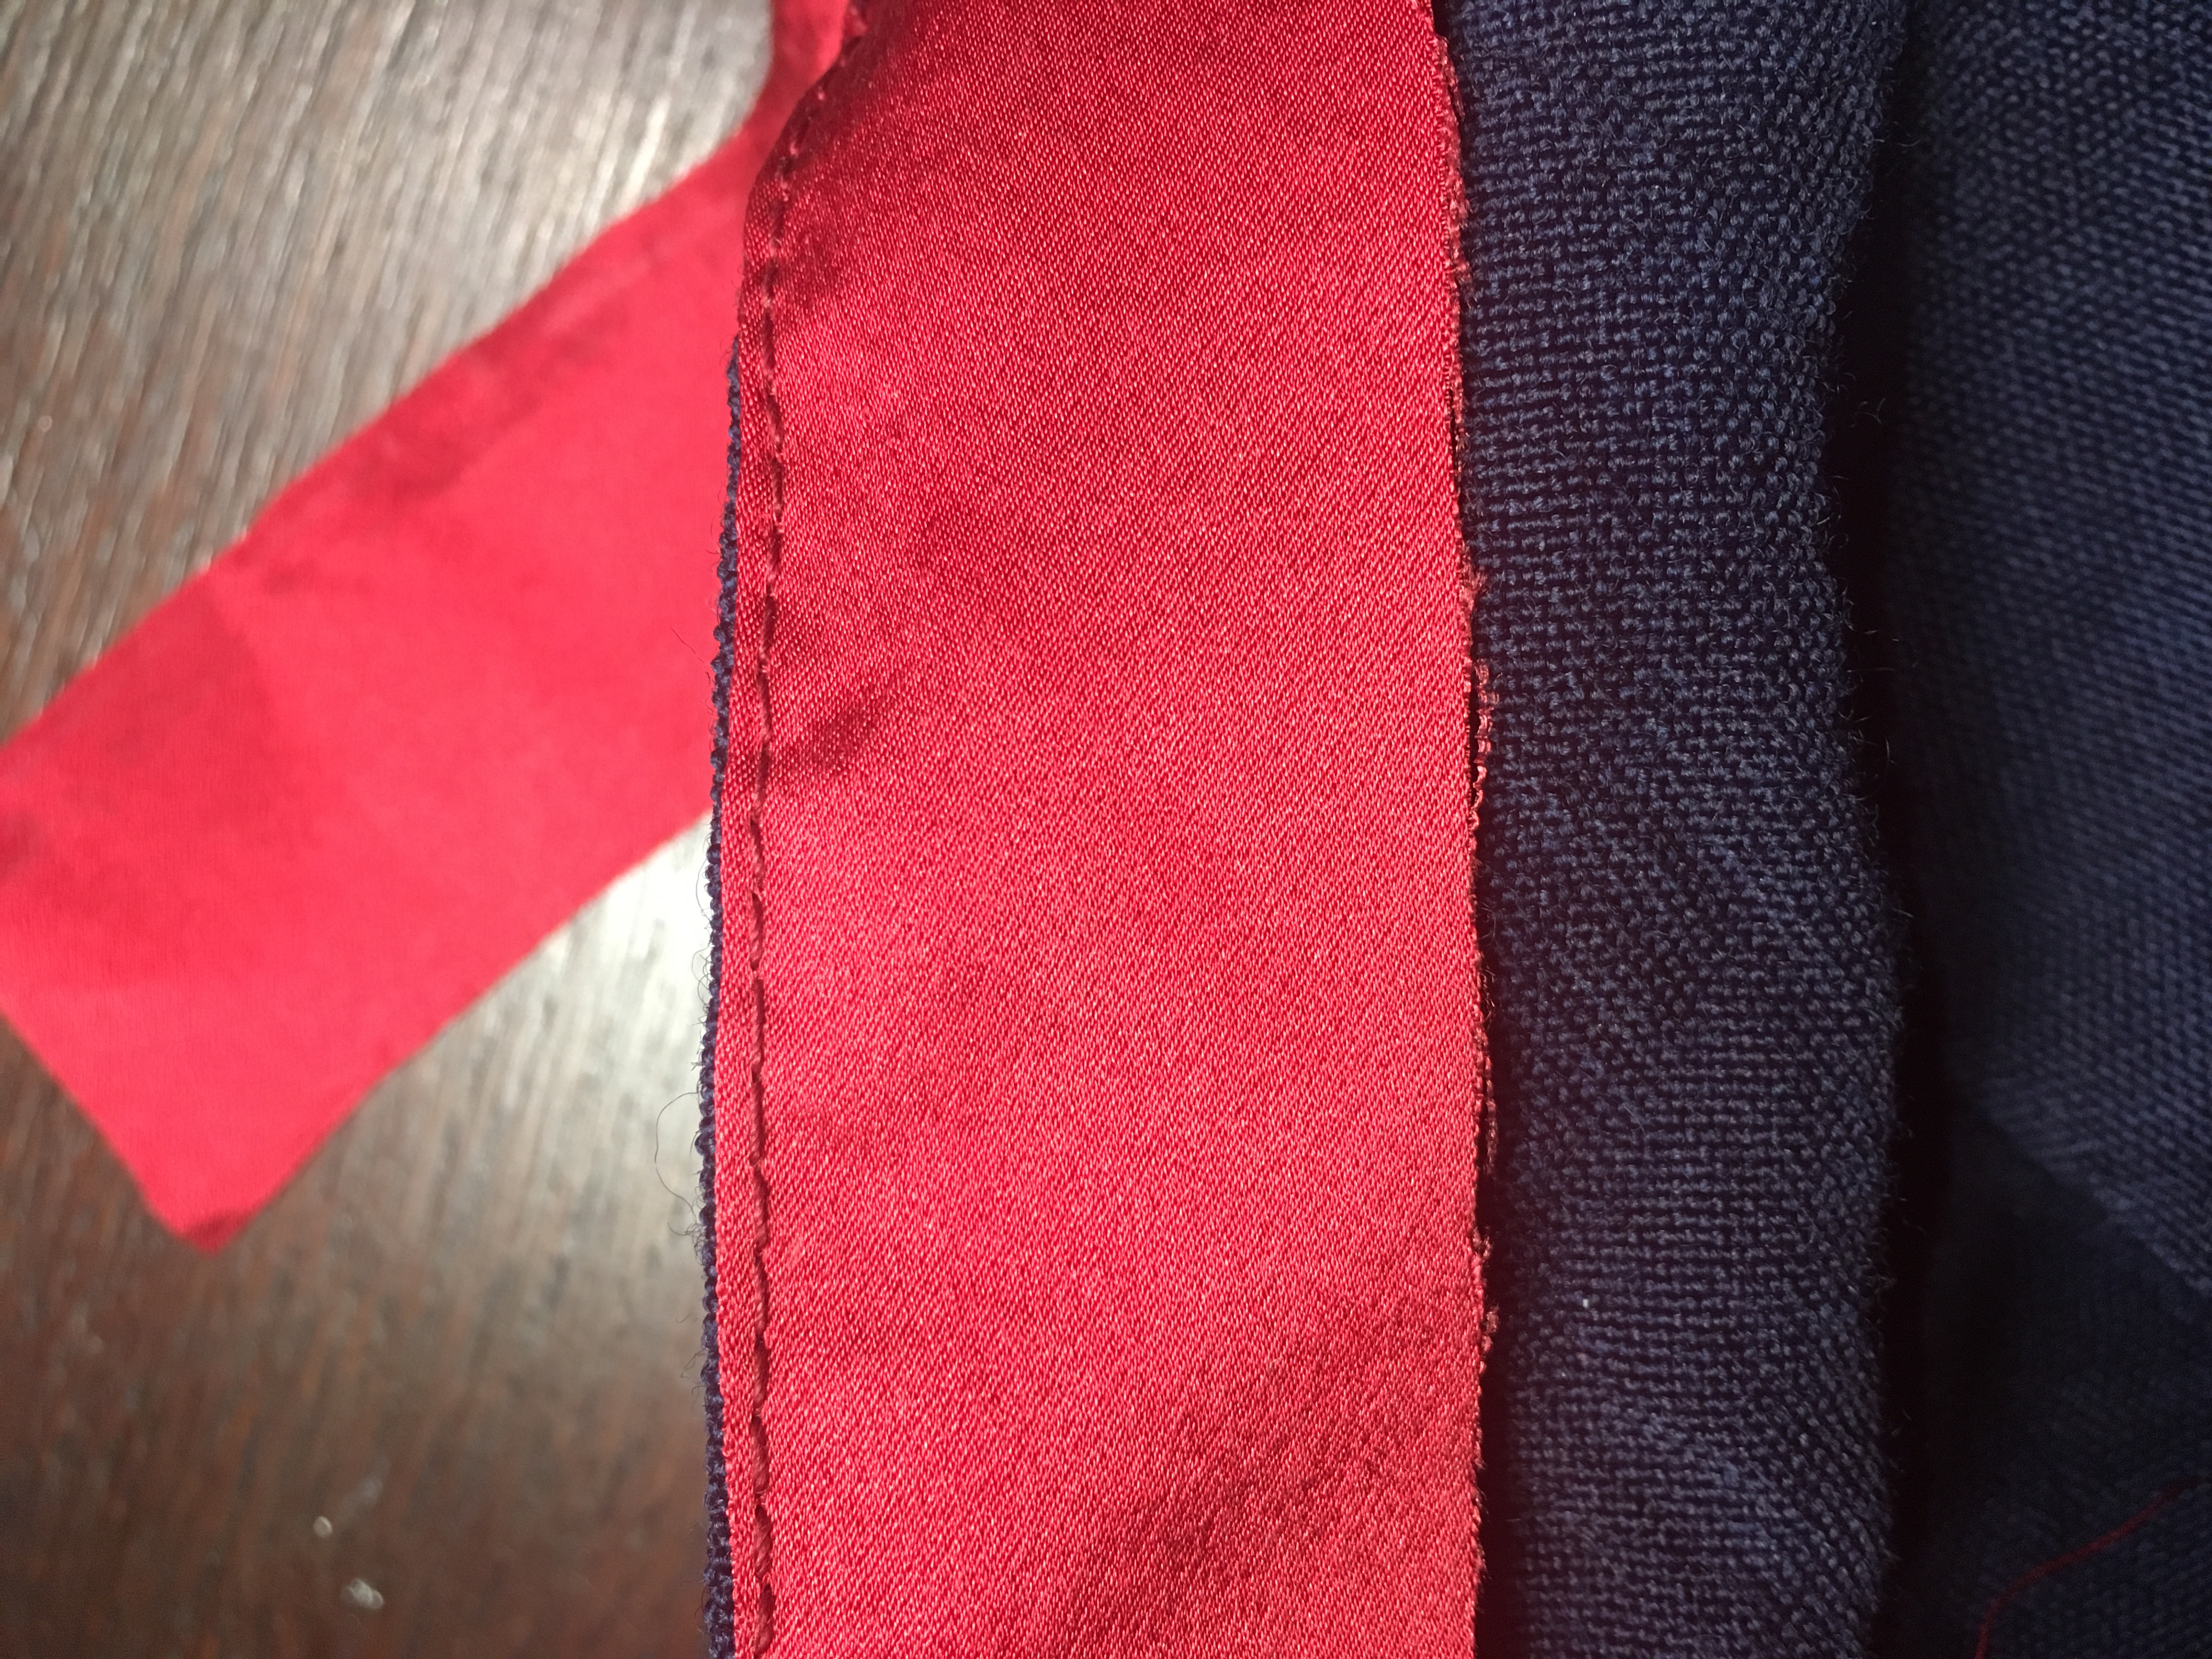
The helmet is of the Chernigov type, and in fact so similar to the original Black Grave helmet that at first glance, I thought a reenactor had left it outside for a few months. The condition of the find is amazing.
Some details and dating
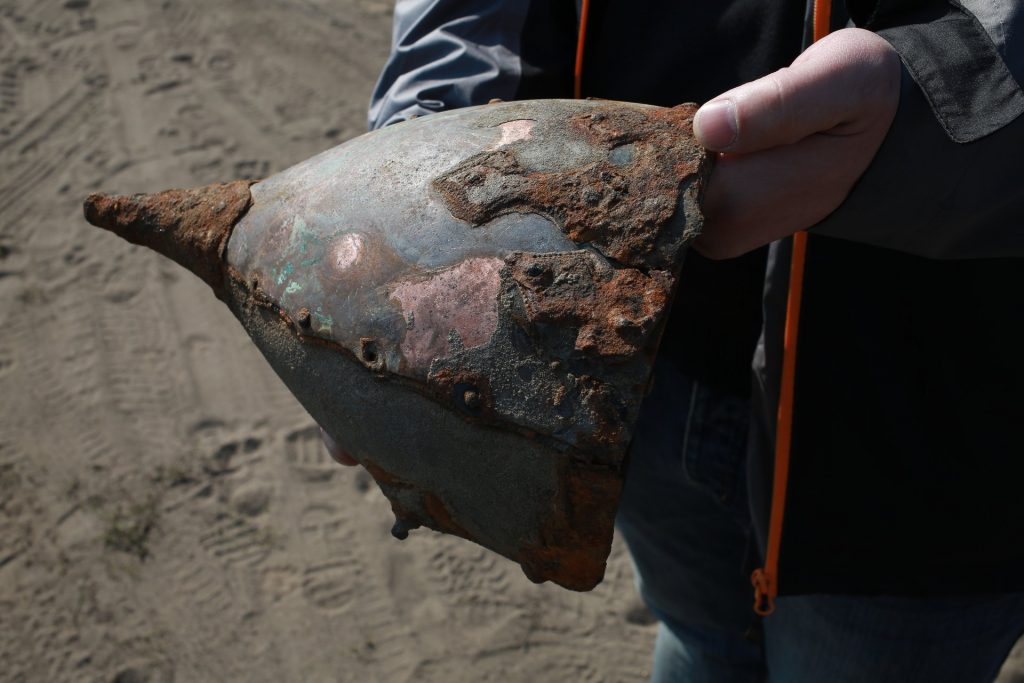
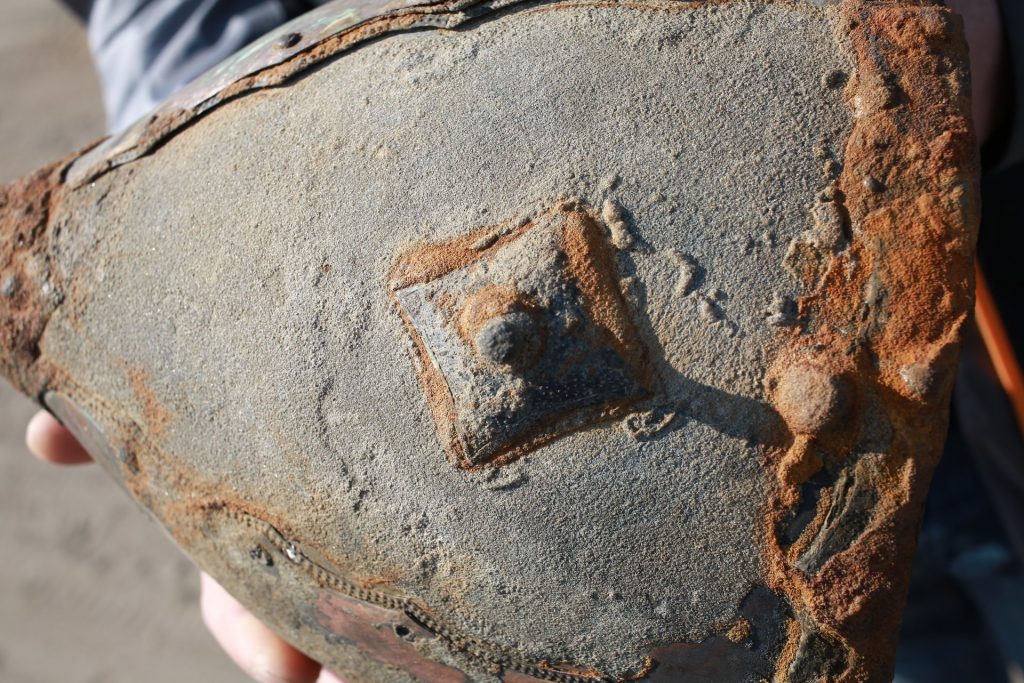
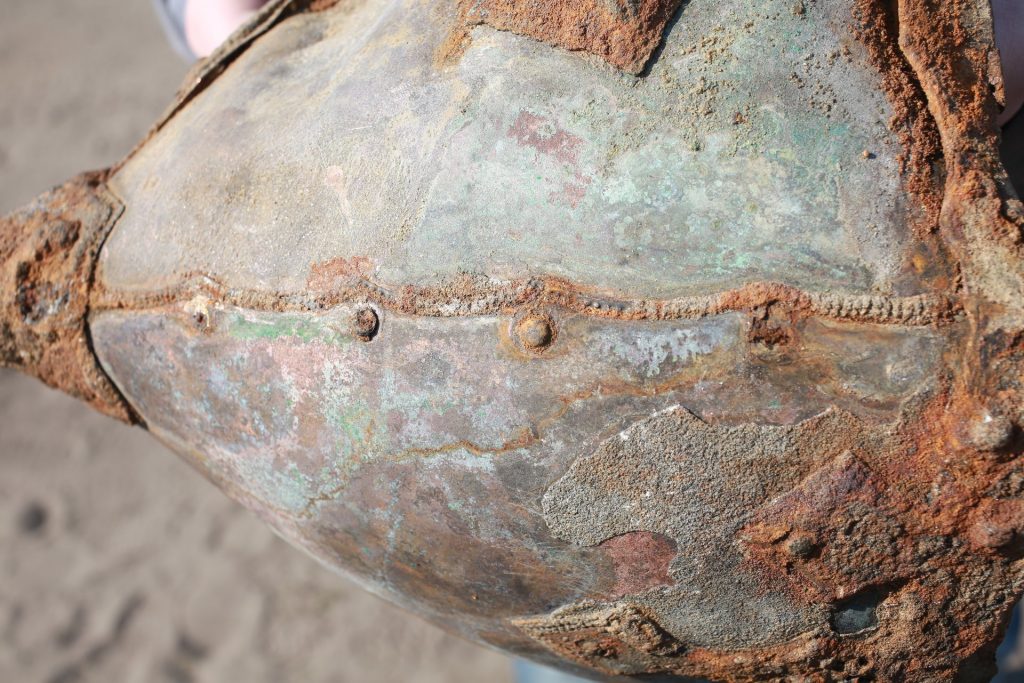
The helmet consists of four overlapping, jagged iron plates, covered by almost identical copper-alloy plates. Decorative elements are attached to the left and right of the helmet, and to the front (three symmetrical lobes, the tallest one marking the center.
In the last picture, you can see a tiny protrusion just above the finder’s thumb, and some enthusiastic reenactors suggested this could have been a nasal that broke off.
Helmets of this type are usually dated to the 10th century AD, and since this find has, as of now, neither undergone conservation nor analysis, it’s too early to say if this tentative dating applies to it. Maybe it is dated to 2010, maybe not.
Some things that now seem hopelessly anachronistic and are dead cheap weren’t that cheap in former times. Artificial light, for example, was far from a commodity. Candles were, at least as far as we know, too expensive for everyday lighting, so viking-age buildings were sparsely lit. The central fireplace gave off some light, and there are several finds of items that held a liquid or solid fuel for lights.
This is a find from Birka, Black Earth (various identical lamps were found in Birka).
The fuel for these lamps was quite certainly animal fat, as vegetable fats (such as olive oil, linseed oil or other vegetable oils) were, and are, too expensive to burn, and have a couple of disadvantages. One of them is the fact that animal fat, especially pig and goose lard, or beef tallow, have a higher melting point, making them easier to handle.
I have one of these lamps as a reproduction, and for the past seasons, I used it with pig lard. This type of fat is readily available in supermarkets (it’s used for cooking), and is not too expensive. However, it’s not one hundred percent authentic and – which is really annoying – it turns liquid at room temperature, making summer events a really greasy affair if the lamp falls over.
I wanted to use beef tallow for a while now, but I never found any in butcher’s shops or supermarkets. Eventually, I thought „why not make it myself?“. We are lucky to have a really awesome farmer around the corner, who raises their own cattle (organic, by the way), and is in control of the whole butchering process. To add to this, they have a son in the same kindergarden as our kids, so I went there and asked if they could help.
Alas, they had no tallow, but they were just about to bring one of their Galloways to the butcher, and promised to set aside the fat around the kidneys, which is traditionally used to make tallow.
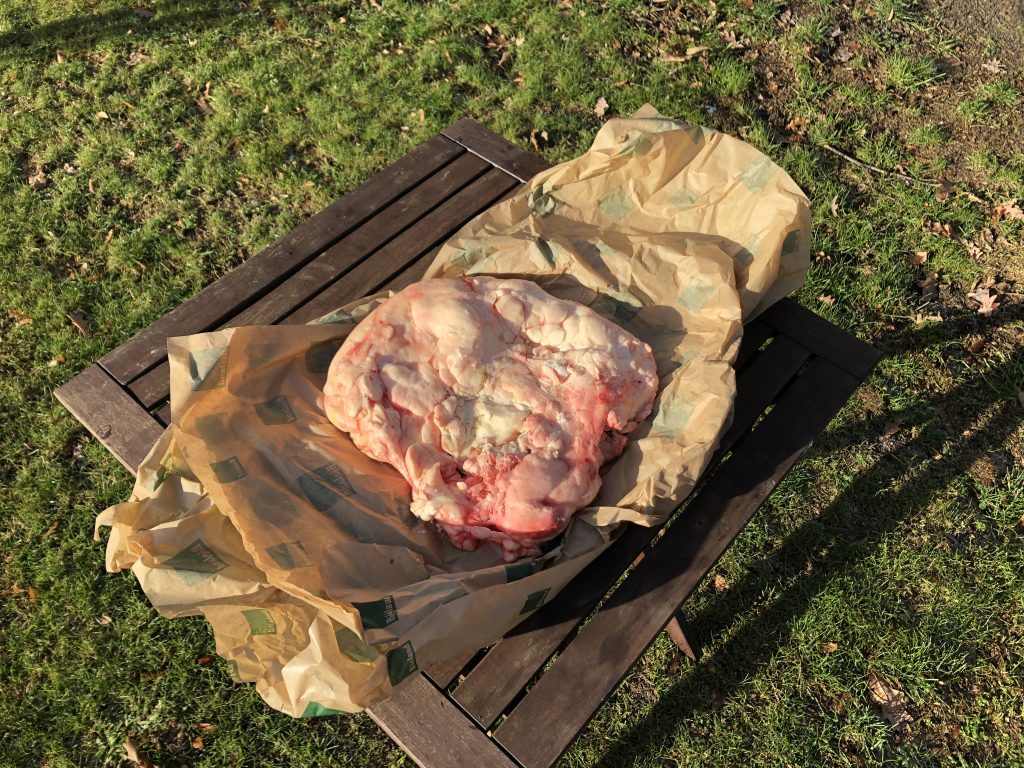
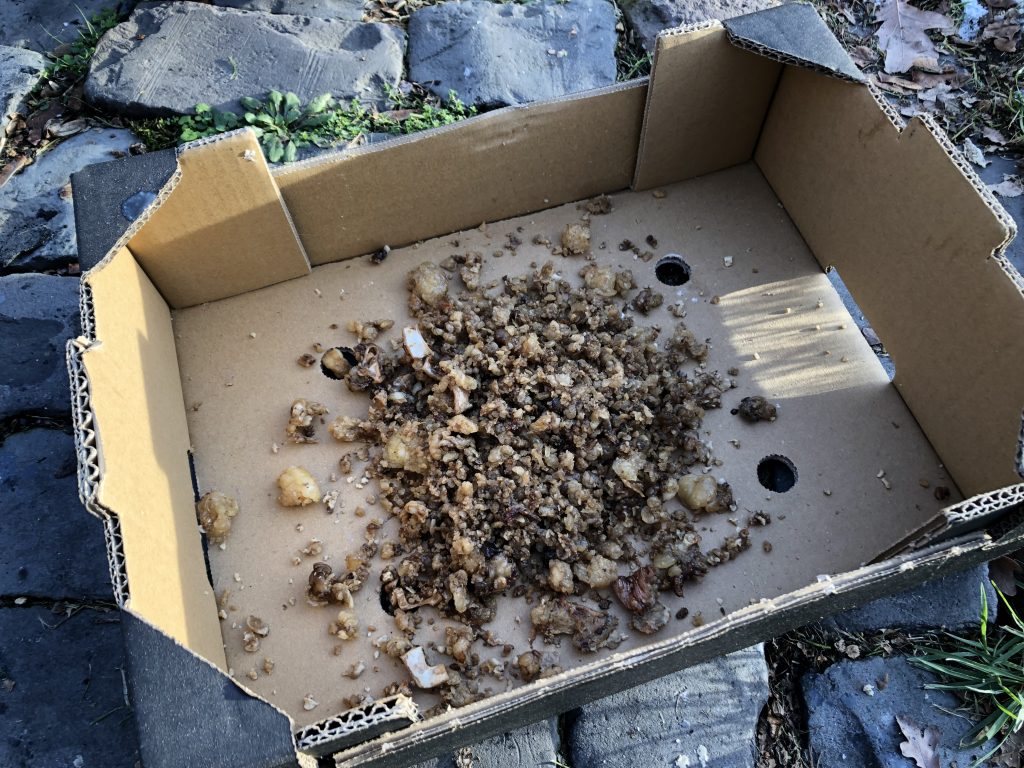
A week ago, I picked up these lumps of fat (around 4.5kg, one of two lumps shown). They have an interesting consistency – they aren’t greasy like bacon, instead they feel like wax. I put them in the garage to wait for better weather.
Cowkidney fat before cutting
This saturday was a nice, sunny day, cold but great. I took lunch naptime as a welcome opportunity to light a fire in my outside fireplace and start making tallow.
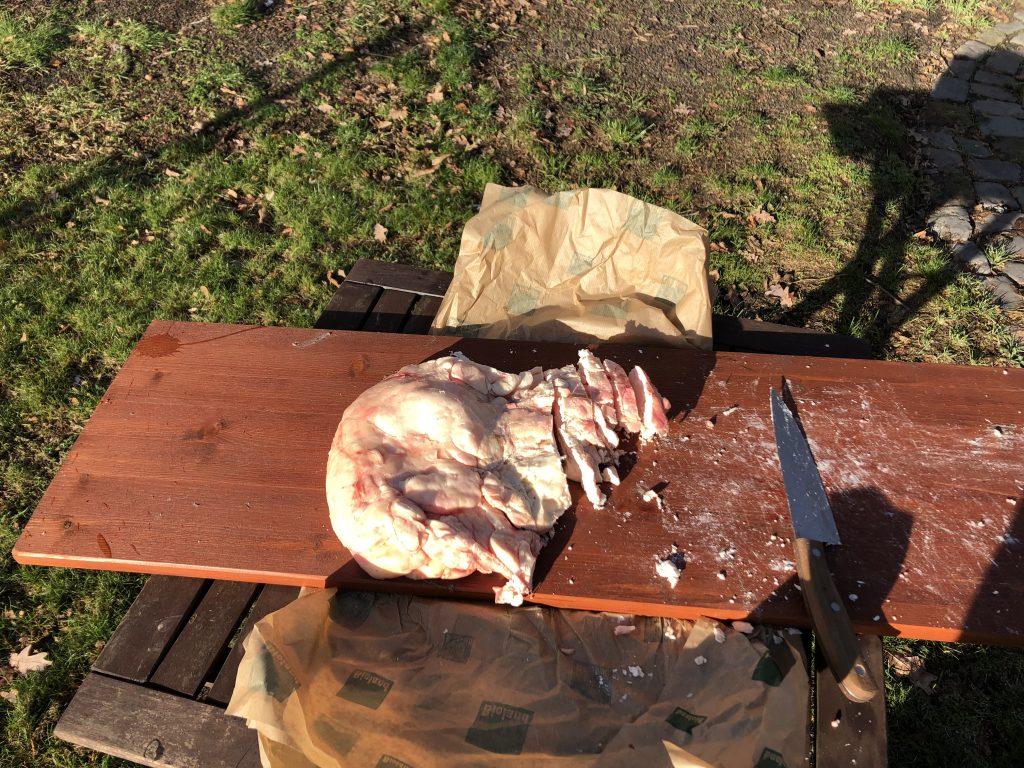
First, I cut up the first lump into small cubes – and the cats loved the scraps that fell down in the process.
Cutting up the fat. This cat can be a bipod if it is motivated enough.
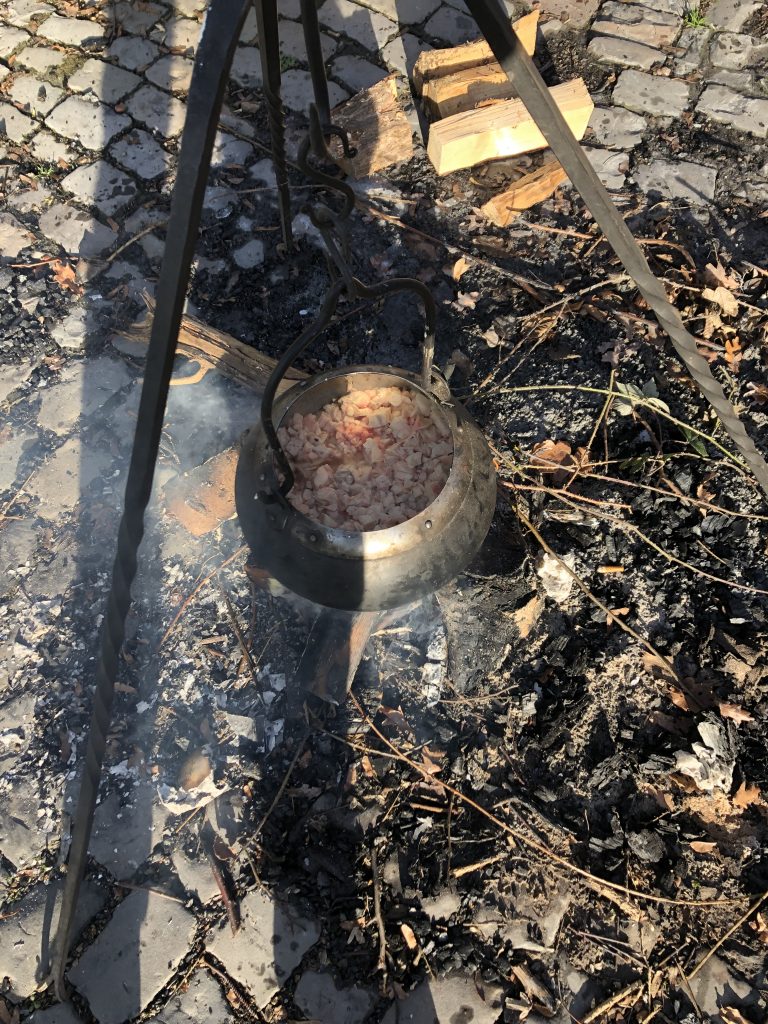
The next step was adding a little water and putting the cubes into the kettle. The water, I found out on the second run, is optional, I’d read that it makes rendering a little easier.
Around two kgs of cow fat starting to cook.
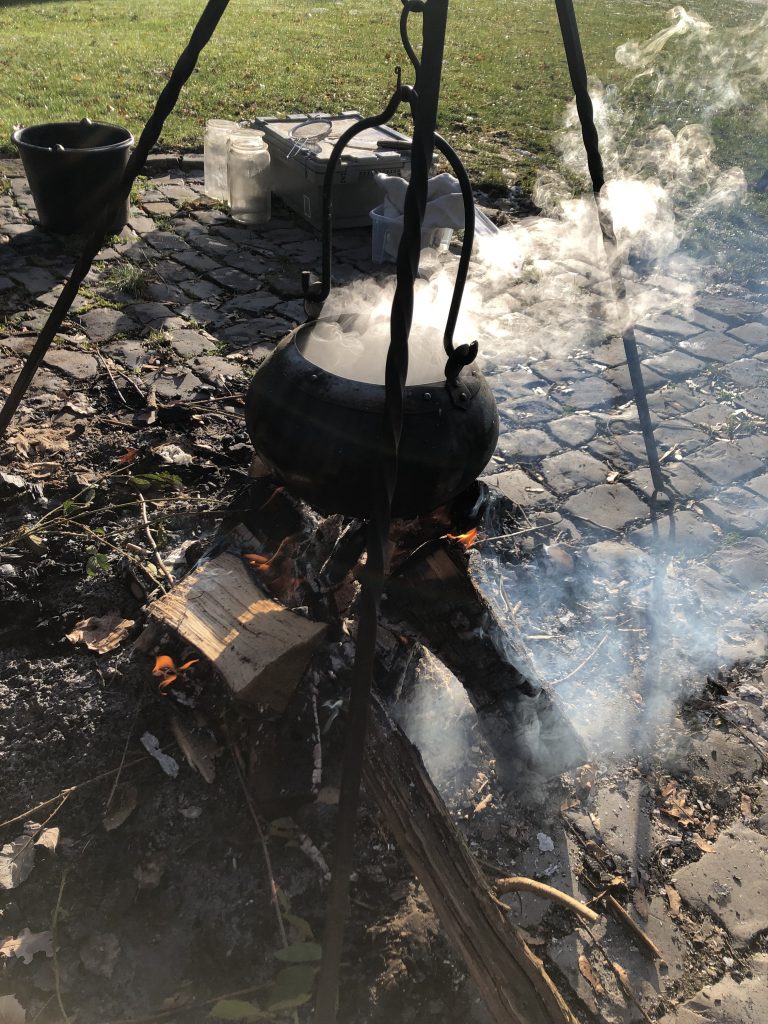
Now I let it heat up, waited until the water dissipated and started siphoning the tallow. It would have been a lot easier if I could just pour everything into a vessel, but the pot is really unwieldy and I didn’t want boiling fat all over myself.
Getting there…
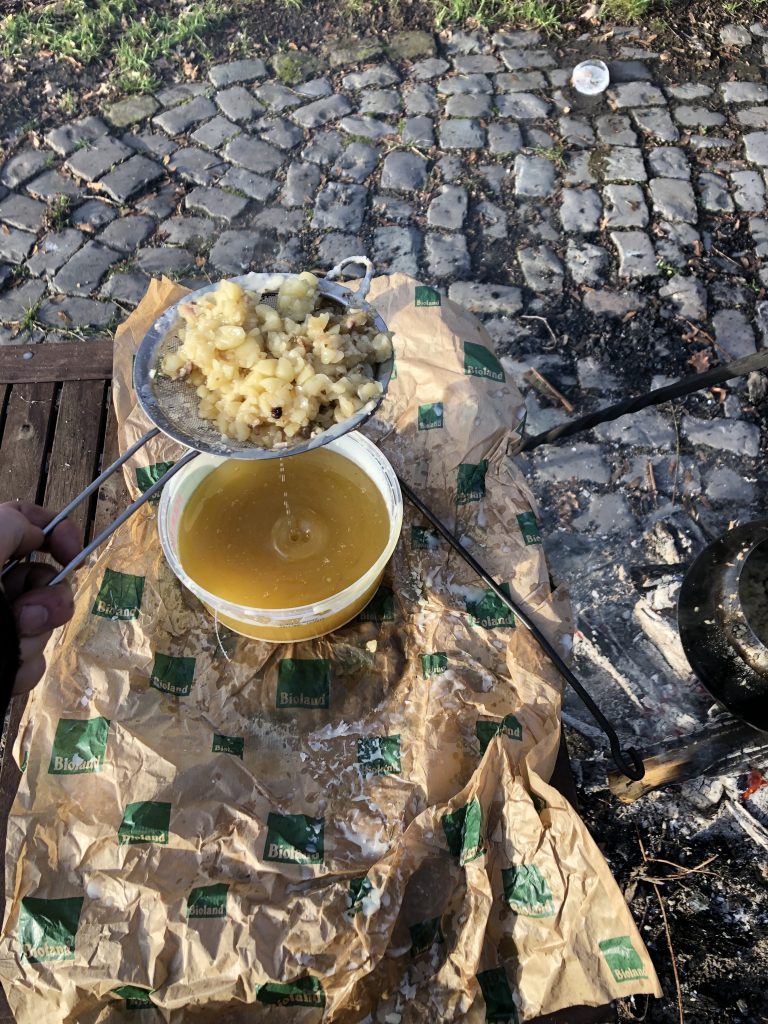
For siphoning, I used a sieve that the kids play with. Had I wanted to make tallow for eating or cosmetics, I would have used some linen, or other fabric, to get clearer results. In this case, a sieve was enough.
I kept doing this several times, and the pieces of fat became increasingly crisper. I threw them back into the pot to increase the yield…
Siphoning the tallow
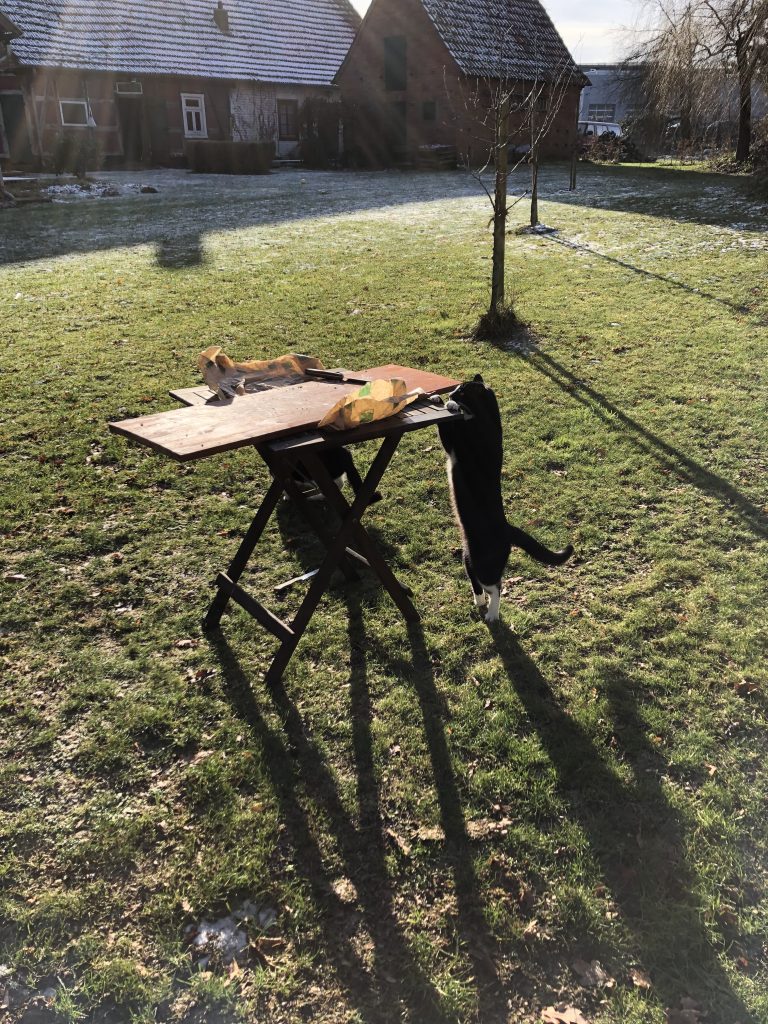
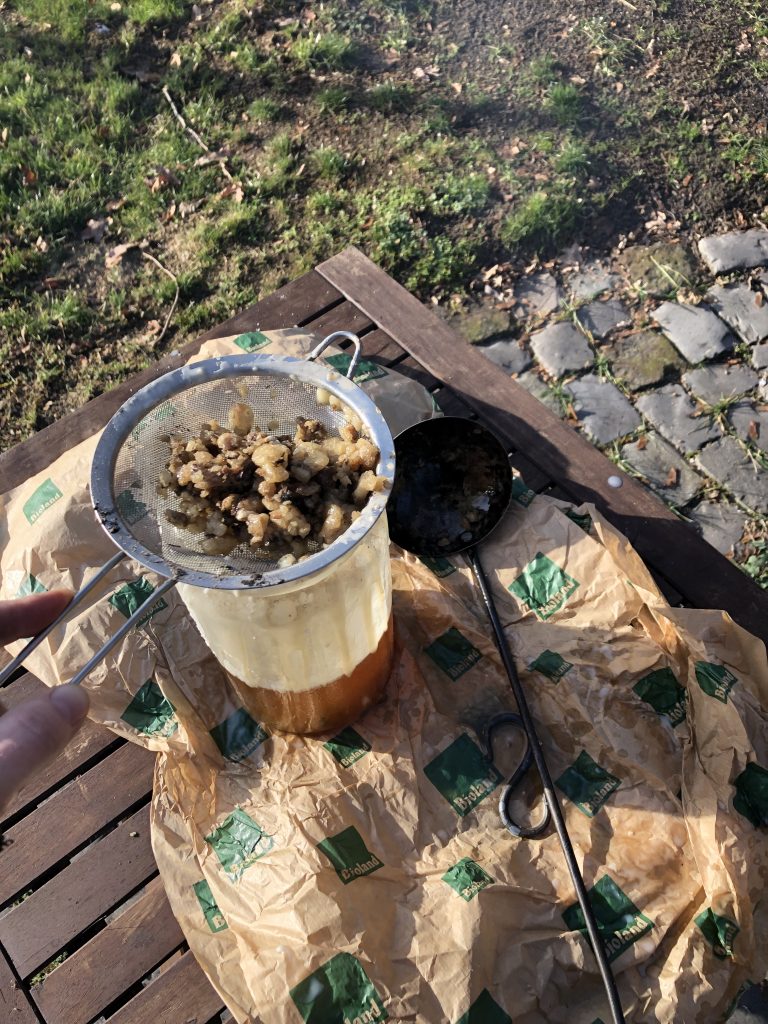
Eventually they were so crisp that they could only serve one more purpose…
The remains of the tissue around the fat – crisp flakes of animal tissue.
…cat snacks! I am not usually a friend of high-fat diet for our cats, but there’s talk about a really rough couple of weeks (-20°C and so on…), and maybe a little extra fat will help them stay warm outside. Or they’ll have massive diarrhoea.
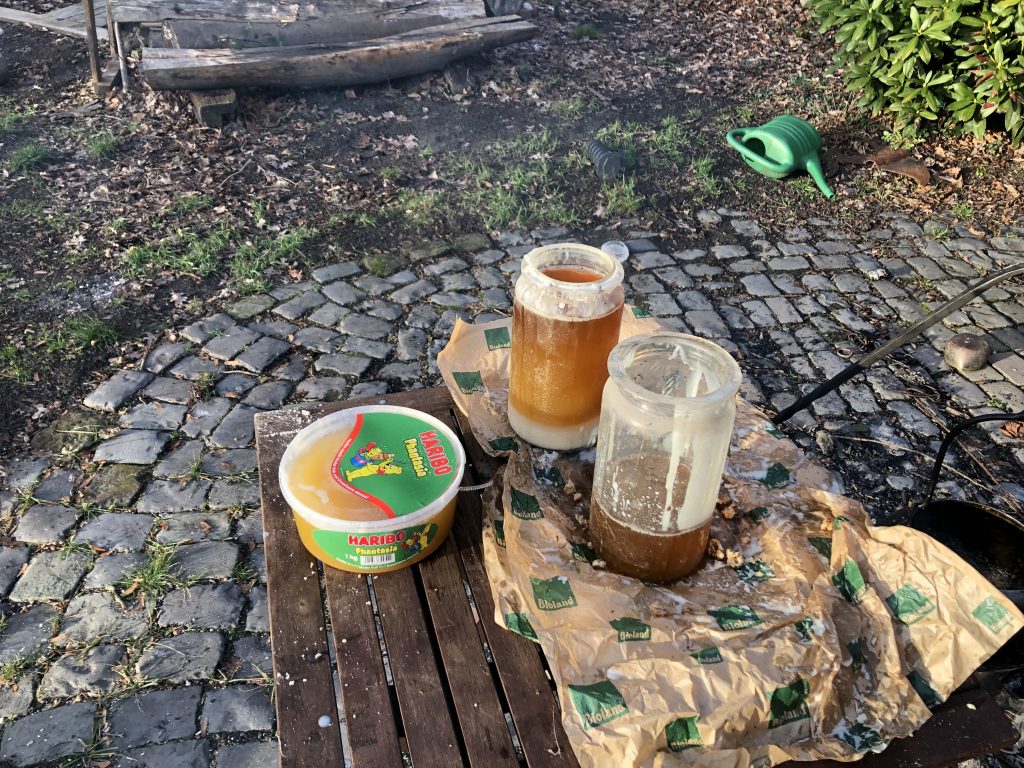
The yield of the day were 1.5 big glasses of tallow (I think one might have around two liters, but I’m not sure) and a plastic container (approx. 1 liter).
The still-hot tallow waiting to cool down.
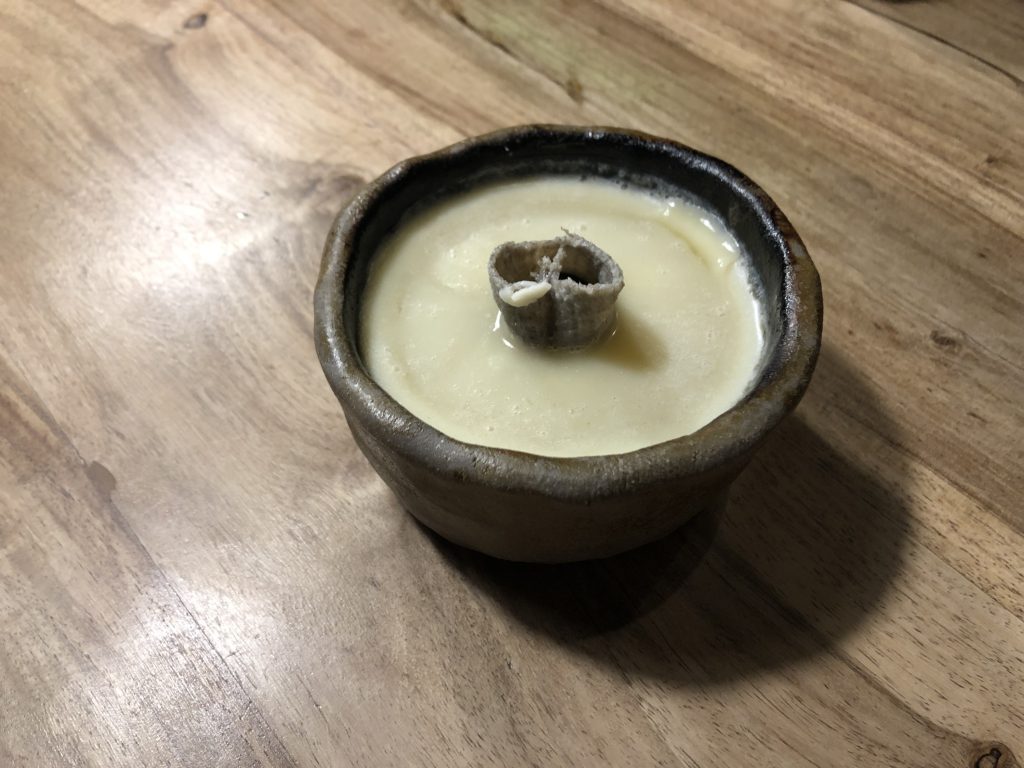
After a while, the tallow had cooled down and became about as hard as candle wax. I left it outside for natural deep freezing, but couldn’t wait to try it out. So i re-heated some of it in a small frying pan and quickly sewed a wick for my Birka light. At this point, I have to thank Katarzyna Masia Konkol for her very, very useful idea of putting a tubular wick over the cone in the middle. It works like a charm.
The finished light, filled with tallow and a fresh wick.
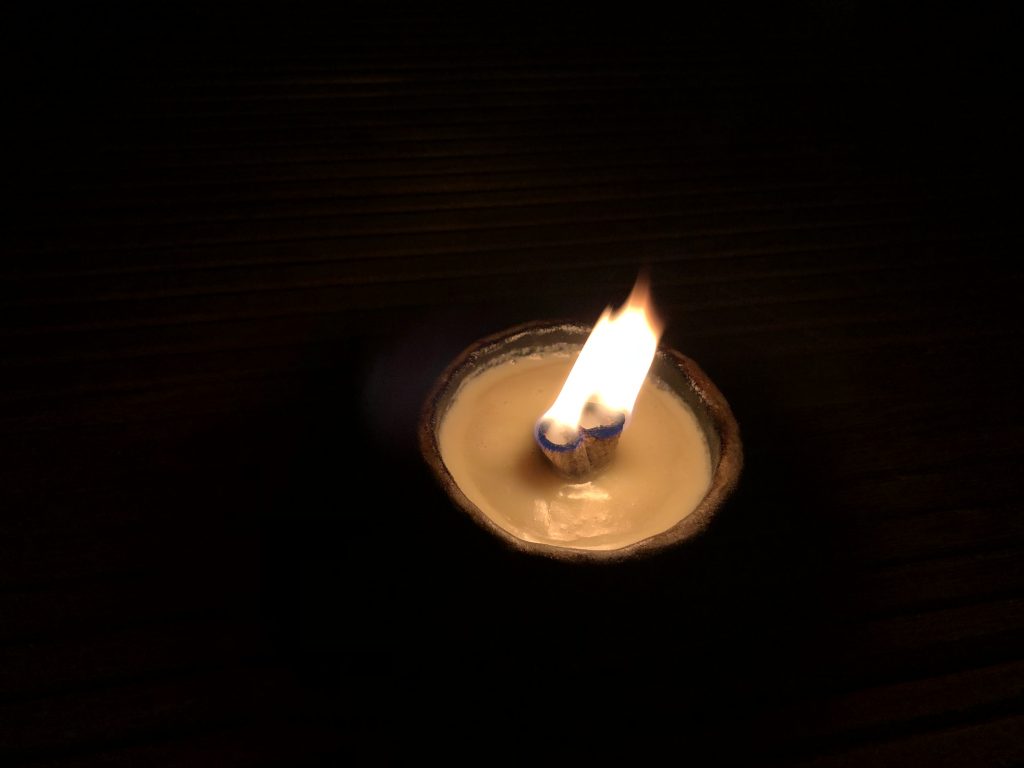
I took the light outside and lit it – and it works great!
Working beef tallow light.
If you can get your hands on cow kidney fat, try making tallow, it’s rather easy. The smell is not as bad as you might think (still, the dripping tallow is really annoying to clean, so better make this outside), and the yield is quite good. I spent less than 10 Euro on the fat, and it gave me 3+kg of tallow.
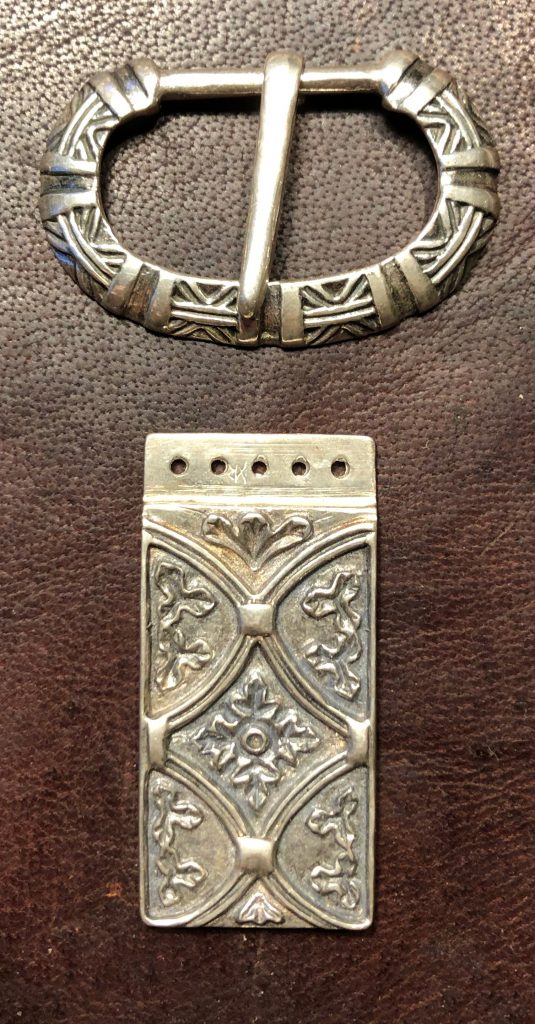
One of my winter projects is recreation of the carolingian silver belt buckle and strap-end from Bj750 (which might or might not have been the woman’s belt, as the grave is a double grave). I plan on using it for a new sword belt.
I bought a very nice replica from Gudred, my usual vendor for anything cast in bronze or silver. This replica is, however, not strictly speaking a 100 per cent replica, and maybe rightly so.
Replica of the carolingian belt set from Bj750, created by Vasily „Gudred“ Mayskiy
Analysis of the original find
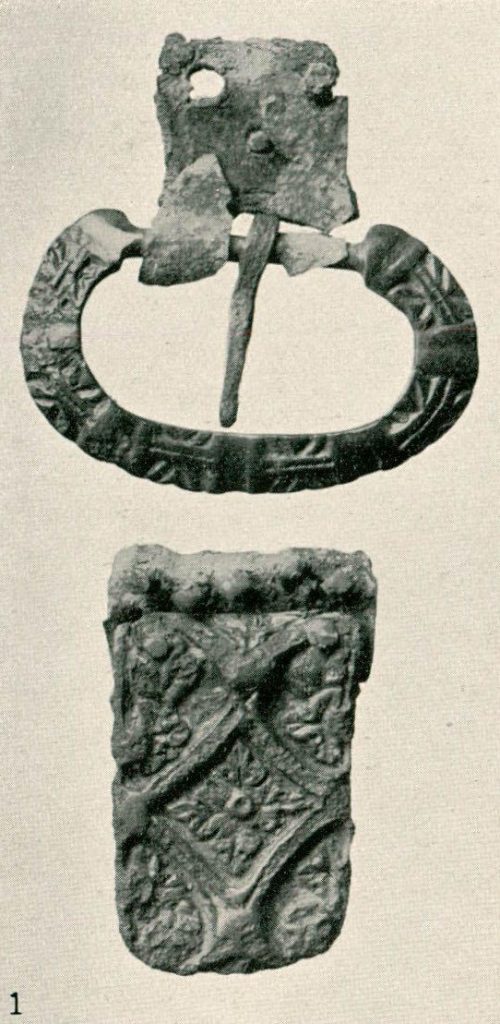
The original finds, especially the strap-end, were modified, damaged and worn. This might be because they were already old when they were put to rest in Bj750, but also because they might have been used as „spare change“ at some point. The image from Birka I:Tafeln shows the original finds, but some construction details are hard to spot.
The strap-end is more round, even tongue-formed, than the replica. This is quite certainly due to wear, maybe also because the use as a strap-end was not its primary usage. There are trefoil brooches in carolingian design which ended up as strap dividers, and as pendants.
Anyway, I suspect that the item was not originally rounded, as the curve is not symmetrical (which it would be if it had been cast round, as numerous examples from other findplaces show). A small detail that can hardly be seen from the picture is the fact that the strap-end has been adapted for usage as a belt.
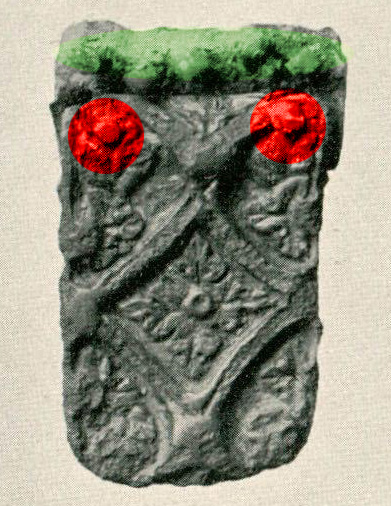
Rivets highlighted. Red: Primary or original rivets, dark green: Additional secondary rivets.
The picture above shows that there are not two rivets (as would be normal for a strap-end that is mounted at the end of a belt), but in fact seven. The rivets highlighted in red are either the original rivets (if the find was never anything but a strap-end), or rivets from the primary modification. They were then used to rivet a small silver plate (seen at the top border, overlap is visible on the top-right edge) to the strap-end. That silver plate has, in turn, five own rivet holes which were used to rivet it to the belt strap.
This method has two advantages:
The belt leather surface is on the same height level as the surface of the strap-end, giving it a harmonious look.
The unsightly rivet plate itself, which is of undecorated silver sheet metal, is invisible.
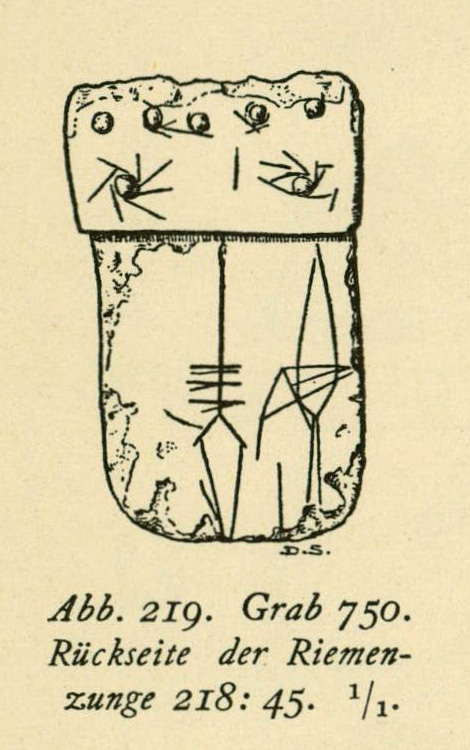
More interesting about this strap-end is the fact that it’s in fact decorated – if you want to call it that – on its back, too. This is a picture from Birka I: Die Tafeln.
Reverse of the carolingian belt strap-end from Bj750
The primary and secondary rivets can be seen clearly, as well as scribbled decoration. Maybe this is supposed to show some religious or spiritual beings, has ritual meaning or someone was simply bored. Birka II likens the shapes to spears or arrows.
Back of the strap-end superimposed on the front
Either by sheer accident, or on purpuse, the vertical line and the arrow-shape on the backside is in line with the frontal decoration’s symmetry axis. The text in Birka II:2 (p110) describes the spear-decorated part as „a piece of silver sheet metal riveted to the strap-end“, which is either a mistranslation or simply wrong, because the lower part obviously seems to be part of the cast strap-end.
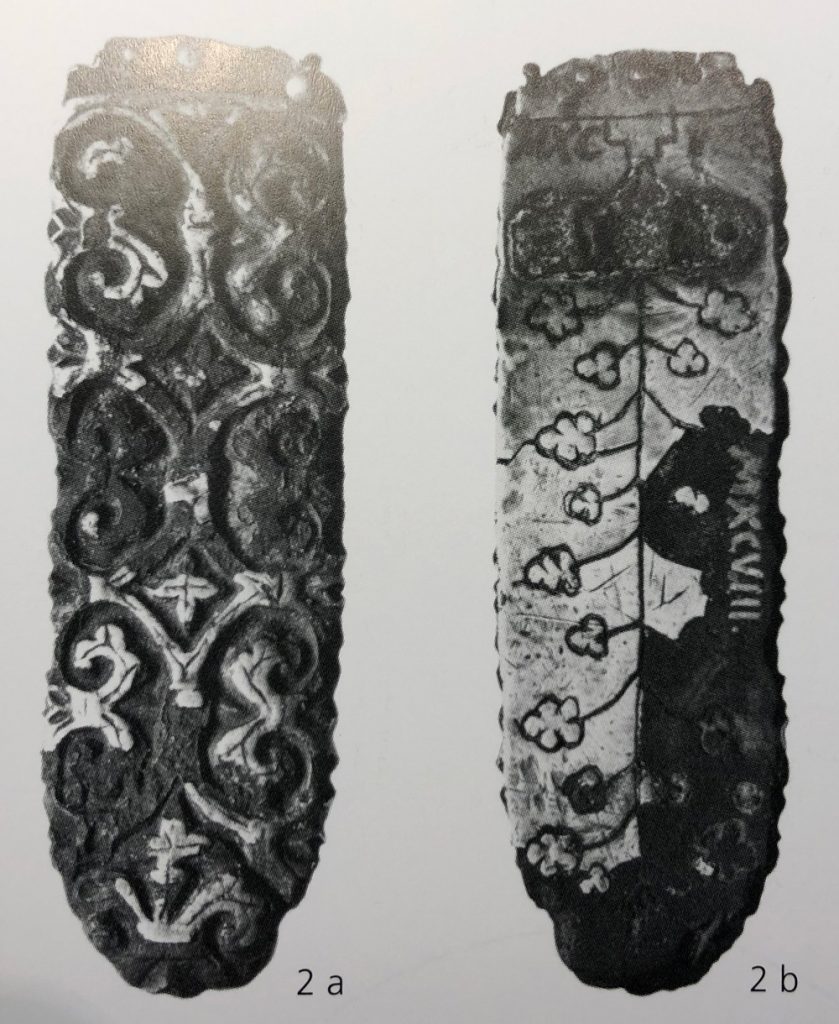
Another strap-end from Hedeby
The strap-end in this picture was found close to the castle („Hochburg“) from Hedeby in 1812, the picture is from Arents/Eisenschmidt, die Gräber von Haithabu.
A strap-end from Hedeby
This strap-end shows very similar acanthus decoration, a more deliberate rounding at the end and – it’s decorated on the back, as well. This decoration looks a lot more purposeful than the one in Birka.
Yet another very close parallel is this find from Hedeby. Unfortunately, the findplace is unknown, it was prospected by Jankuhn and first published in his 1934 book about Haithabu. It’s a rectangular bronze part of a belt mount (?) with secondary usage as a fibula or brooch.
Mimic repairs or keep the nice look?
My question is: Should I mimic the repairs/reporpusing and the amateurish decoration, not knowing what it was intended for? Should I deliberately age and damage the replica? The people who wore this belt clearly valued it so much that they not only repaired it several times to keep it in service, but also gave it to the deceased in their grave. Would they have access to the „nice“ version with clear edges, and no repairs, they would have used it, I presume.
However, the worn and secondarily decorated look is more accurate as a representation of the item’s *current* state.
What would you do? I’d love to read your opinions!
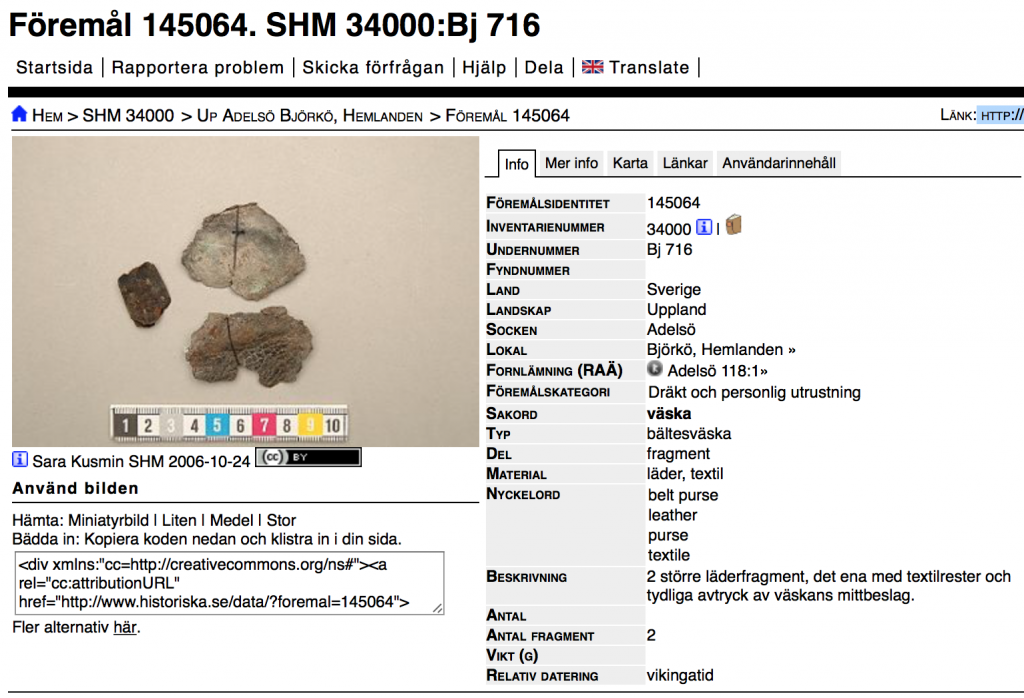
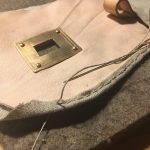
The grave 716 in Birka is famous especially for its richly-decorated Magyar belt, which was one of my first projects in Viking reenactment (see here: Der Gürtel vom orientalischen Typ aus Birka Grab 716). However, this grave also contained the metal, leather and linen remains of what was most certainly a belt pouch. [Interestingly enough, Inga Hägg seems to have mis-interpreted the remains as a leather caftan with metal loops in a paper from 2001.]
The find
The pouch was a lot simpler than most tarsoly finds from Scandinavia and other tarsoly-bearing countries (especially the Rus dominion as well as the Magyar and Bulgar Khanates). Instead of the usual center mount with floral/palmette designs, cast from copper alloy, this pouch had a simple metal sheet with line decorations as a center mount.
Metallic remains of the pouch from Björkö Bj716, from Birka I: Die Tafeln (plate 136).
The interesting part, though, is not the center mount, but the little piece of metal bent to it. It’s a metal hook or clasp, and was used to close the bag instead of the more common „pull the strap through the slider“ principle which is well-documented for many other extant finds.
This means that in addition to the two well-known principles of closing a tarsoly,
with the center strap pulled through a slider and the center mount, like the Rösta bag or the bag from Bj93
With a little buckle that slid into the center strap, like the Panovo pouch,
there is a third option being realized in Bj716. The hook was riveted with one rivet to the leather underneath, and held the bag closed when it was clasped into the center mount. I will elaborate at the end of this article what I think this means.
Leather and linen
The remains of the pouch leather have some „textile“ attached to it, as per the find description in the SHM database.
Screenshot of the leather remains, showing „textile“ in addition to the leather part. From: http://www.historiska.se/data/?foremal=145064
Now, is that textile wool or linen? An interesting question and neither the Birka books nor the SHM database offers an answer.
There is a paper by Inga Hägg from 2001 named „Methodische Probleme der Erforschung ur- und frühgeschichtlicher Gesellschaftsstrukturen am Beispiel Birka“ (transl. „methodical problems of researching antique society structures at the example of Birka“) (to be found via Google Books: Festschrift für Helmut Ziegert) in which she writes, in my opinion incorrectly, about the grave Bj716:
"Der Tote in Grab Bj716 hatte ein leinengefüttertes
Gewand (Kaftan?) aus Leder mit Lederösen und Bronzeknöpfen in der
Öffnung vorn und einen Ledergürtel mit orientalischen
Bronzebeschlägen. Darunter trug er eine Tunika mit Seidenapplikationen
und silbernen Brettchenbändern, eventuell auch einigen aus Gold."
Interpreting the leather remains as a caftan with linen lining is a rather bold speculation, which, to my knowledge, has not gained any traction in the scientific community. However, Hägg confirms in this paragraph that the textile remains are, indeed, linen.
A reconstruction attempt
There are awesome reconstructions of the Bj716 pouch by very talented leatherworkers, and their craftsmanship is uncomparable – I’m a dilettante and I know it. 🙂 However, I wanted to create a reconstruction that has the correct materials, is constructed in the correct way and feels like the original may have felt.
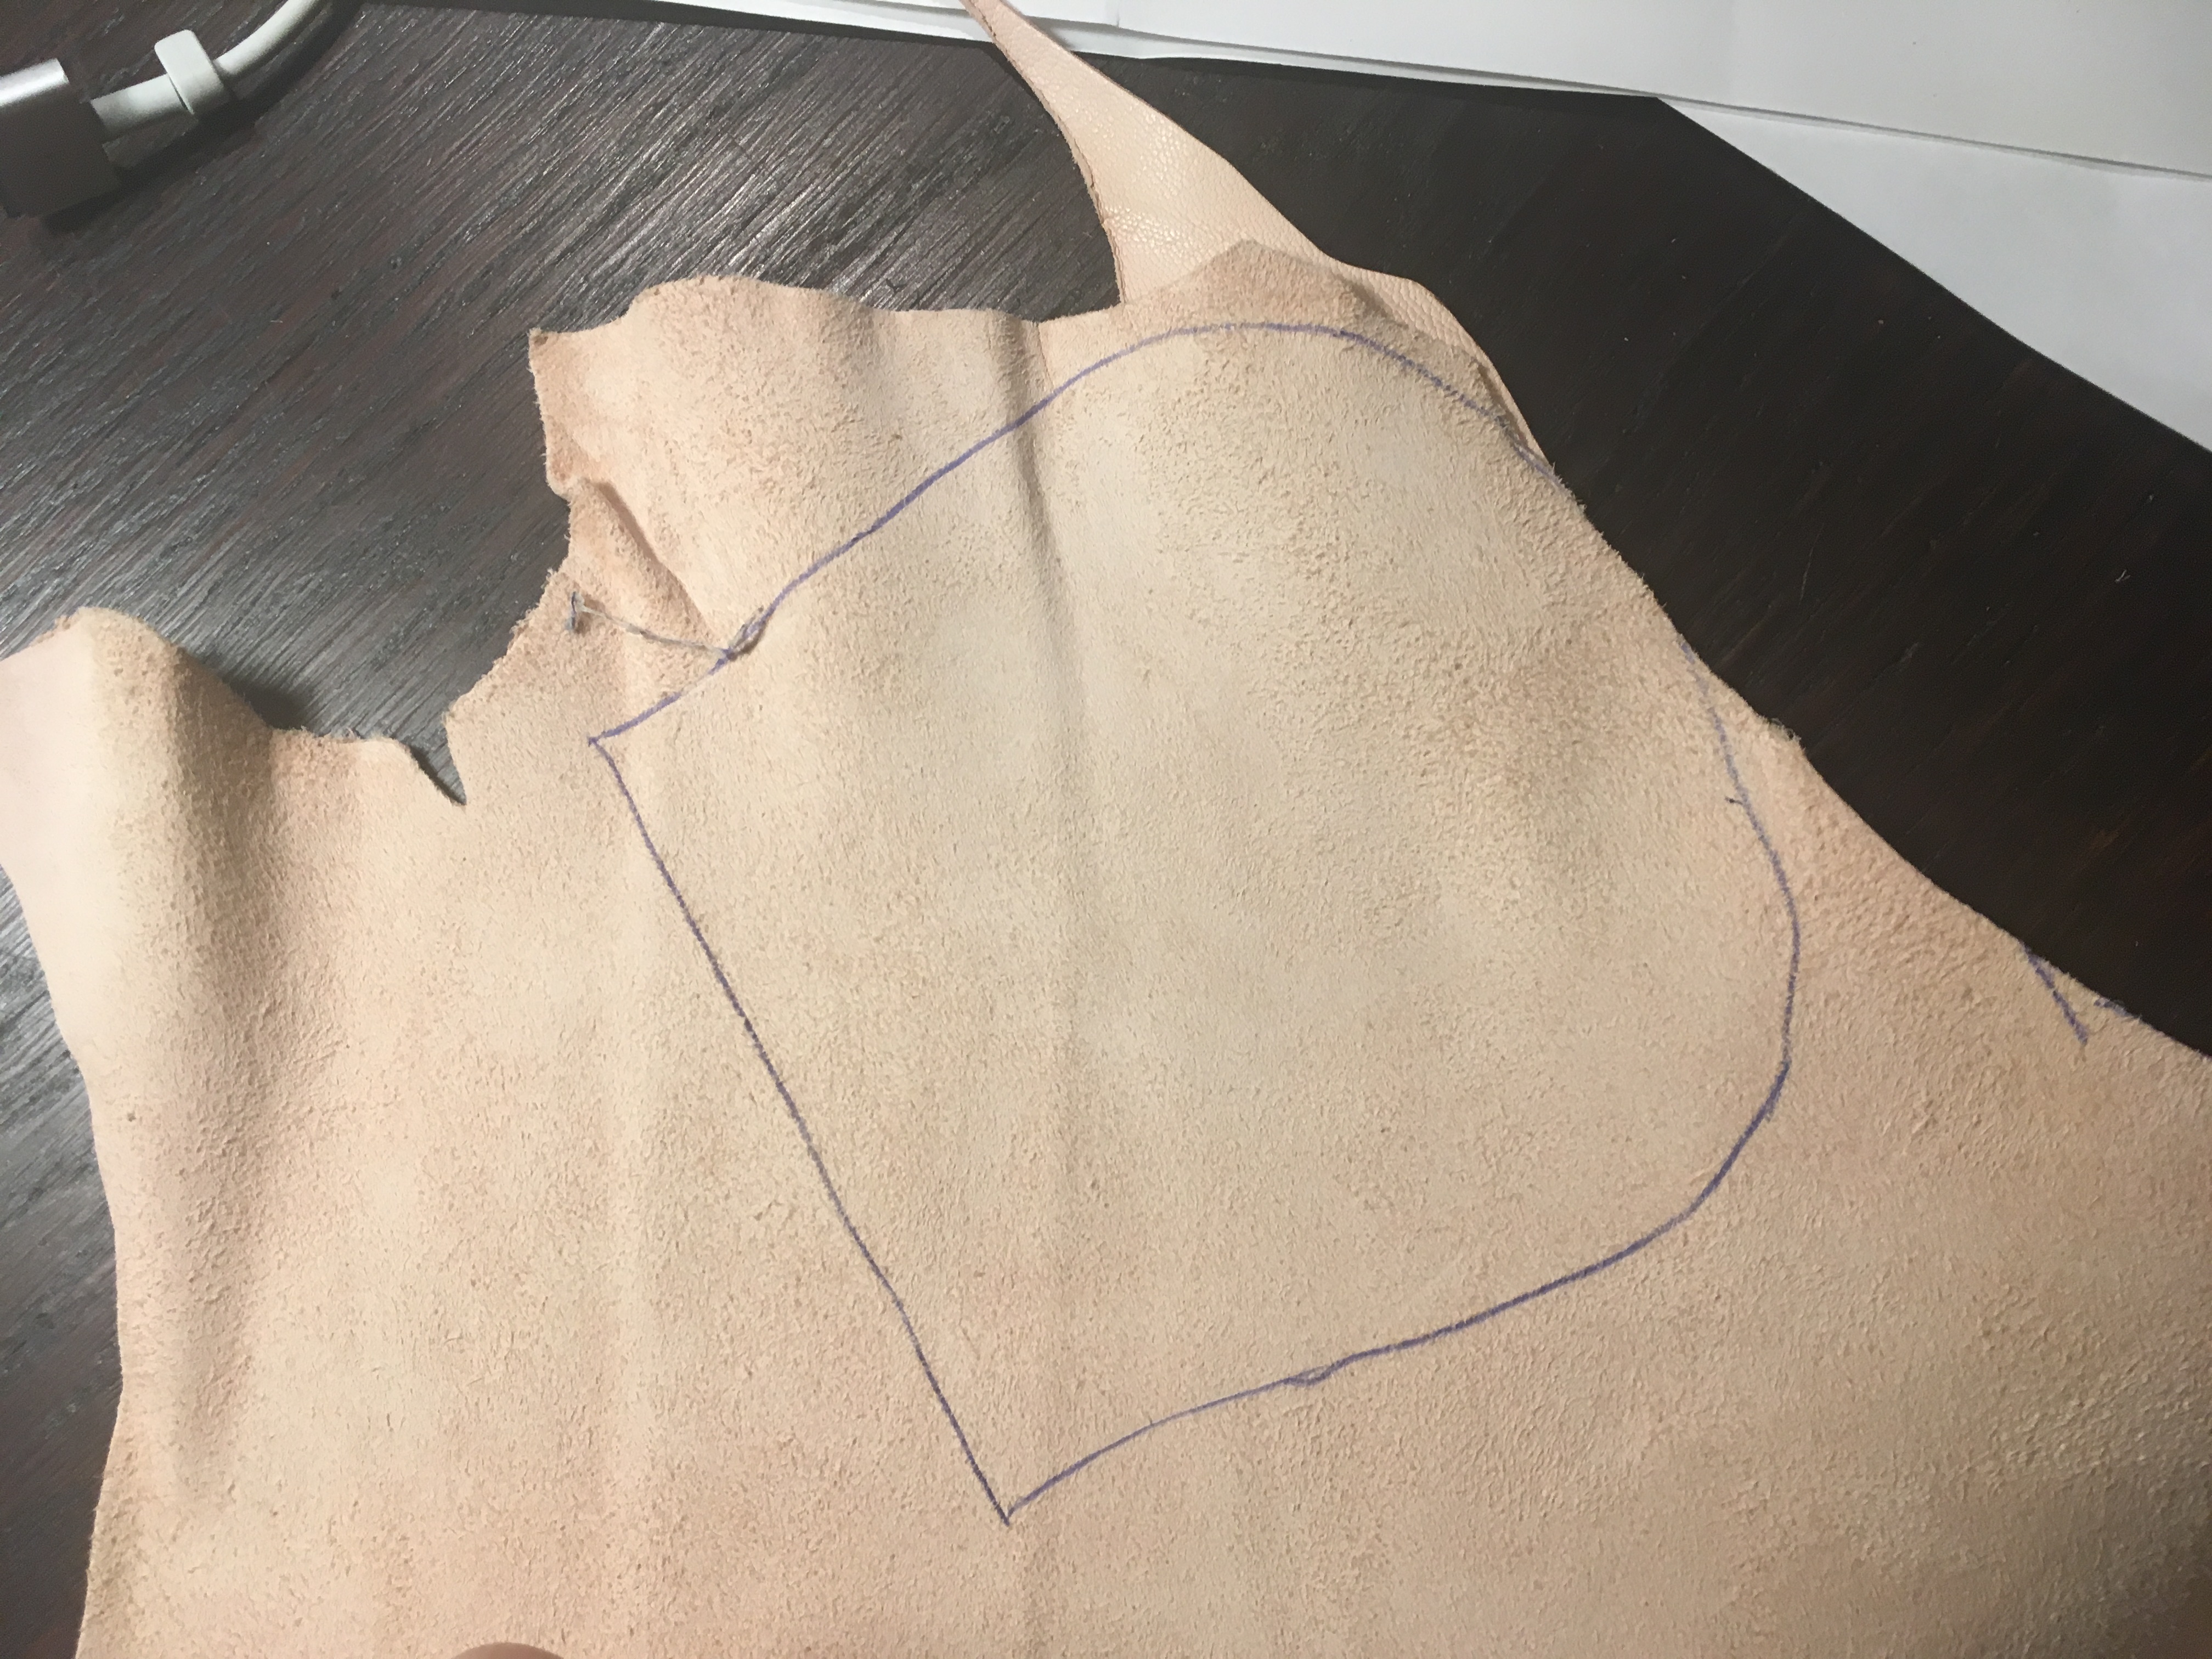
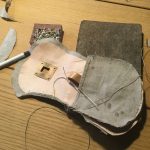
Therefore, I chose goat leather (from the grain in the find pictures, I believe the original may have been cow, but I’m not sure), linen and copper alloy (a.k.a. „bronze“) for my reconstruction. I used a slightly widened version of the pattern I employed for an earlier reconstruction, but tried not to go overboard with the tarsoly’s size.
The pens I used to mark the leather and linen parts are also the only modern tools employed in making the pouch – no power tools or other modern utilities were used (apart from some drops of glue to hold the lining in plan). After cutting the leather, I quickly assembled and turned it to find out the correct measurements for the copper-alloy parts.
A rivet plate in the making.
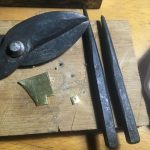
I used some leftover bronze for the center mount, punched four holes in it and chiseled the line decorations into it. I have far too little practice with chiseling and metalcraft, but the general design is easy enough. After that, I cut the hook, punched a hole into it and made five rivet plates to counter the rivets on the inside of the leather.
But wait, isn’t this upside down?
Test fitting the central mount in the archaeologically correct position.
Then, I could try fitting the center mount to the leather to see how it looks. In stark contrast to most tarsoly reproductions out there, this is the correct way to fit the Bj716 center mount – the short sides are the horizontal sides and the long sides are vertical. This is very evident if one looks at the pictures of the find with the center plate and the hook still attached to each other (before they were separately archived at SHM).
It might be argued that the hook is indeed part of the metal loop/slider that is used for many modern reconstructions. However, I fail to understand how only half of that slider could be preserved (and so well, too), and how it should have been bent around the center mount in the fashion in which it was found. Also, there are actually no finds of these metal center sliders, as far as I know – maybe leather sliders/loops were used instead.
Everything seemed to fit well, so I riveted the center mount to the leather as the next step. Why is it that out of four rivets, one turns out really great, two are so-so and one rivet is really crappy, bending and flattening in an uneven fashion? I keep having this problem.
I decided to give this belt a very short loop as I plan to attach it permanently to my Bj716 belt with a metal ring.
Lining, lining, hemming
Hemming the flap
Sewing the pouch from Bj716
Next step: lining the thing. I cut the lining from some grey linen that was left over from an underdress (I think), and I cut it a little wider to provide for some hemming, as I wanted to forgo the usual leather hems on the flap and inner pocket this time. This proved to be time-consuming, but ultimately rewarding work. I used waxed linen yarn to sew the hems (and the leather). Like the original finds, I sewed the pouch „inside out“.
The hemming proved a little challening, as the yarn is rather thick and it was a little fiddly to hem the pouch, but ultimately I was done.
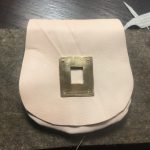
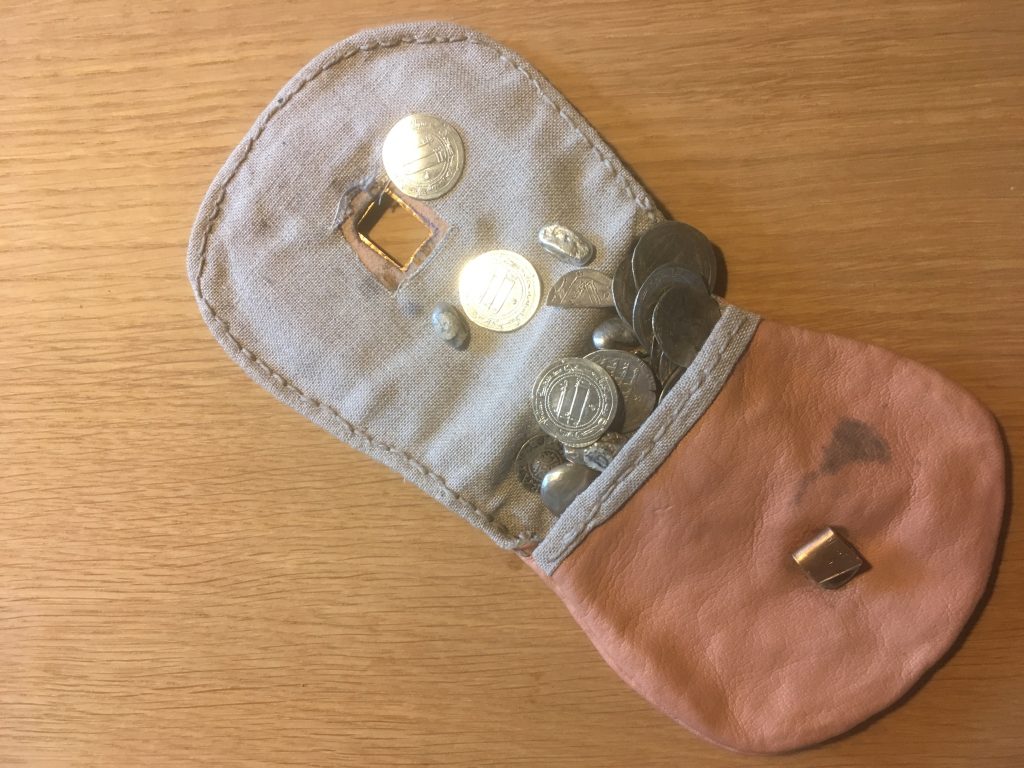
The completed pouch
I watered the pouch, turned it and carefully pushed the seams outwards to give the pouch its final shape. When I took the pictures below, it was still a little wet, so the colour will likely change after treating it with beeswax/leather fat.
A reconstruction of the pouch from Bj716 with the flap opened
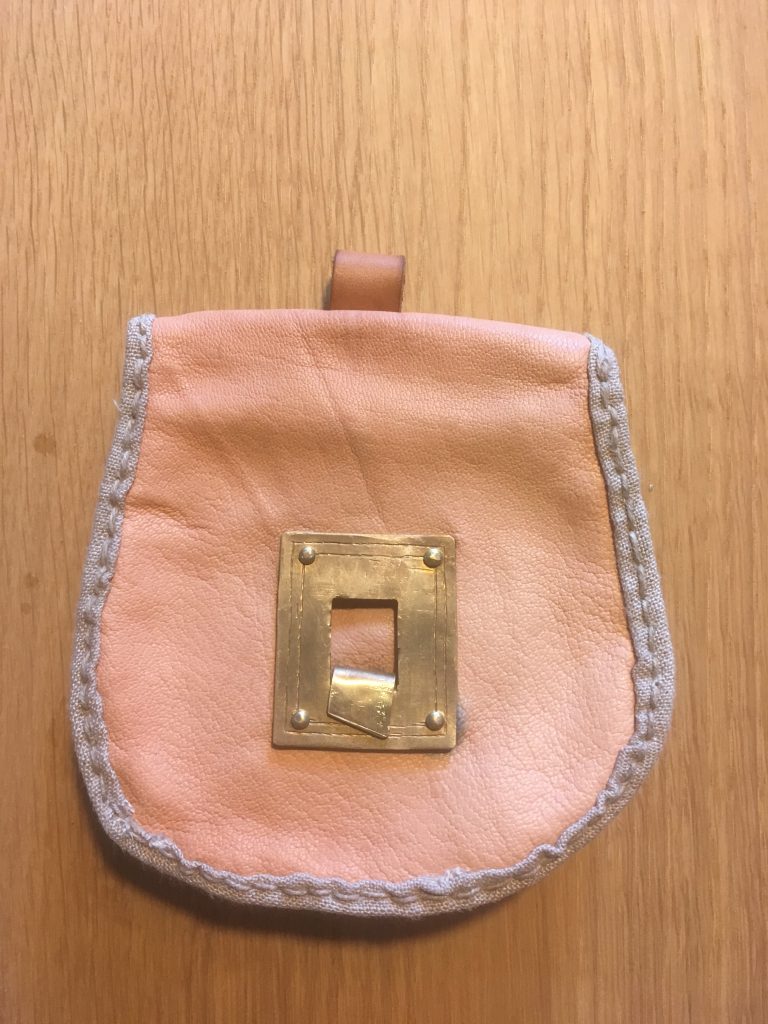
Finished reconstruction of the pouch from Bj716
The peculiarities of Bj716
The grave 716, as I said earlier, was famous mainly for its belt with rich bronze decorations. This belt has been discussed at length in academia, especially in the body of work by Charlotte Hedenstierna-Jonsson and her colleagues. Much speculation has arisen if the person in the grave was indeed a native Scandinavian or rather a magyar mercenary who died as a member of the garrison and was laid to grave in Birka’s cemetary. The grave contains caftan buttons, so there was clearly a tendency to wear Eastern fashion by the guy in the grave.
The way the tarsoly was constructed, however, makes me think that it might have been a Scandinavian in that grave, after all. Its crudeness (compared to the elaborate copper-alloy mounts in other tarsoly in Birka) screams „cheap local imitation“ to me. This is purely speculation though, as no osteological/genetical analysis of the bones from the grave is known to me.
Summary
In this article, I present a reconstruction of the pouch in Birka Bj716 which is correct according to the archaeological record. The center mount is placed with the long sides vertically, and a simple hook from copper-alloy metal is used to close the pouch, instead of the strap-and-loop system that is usally applied. The pouch has been reconstructed with only the materials found in the grave, namely copper alloy for the central mount, leather for the pouch and linen for the lining. Thanks for reading!
One of the parts of my kit that I was kind of ashamed for was my shield glove. I took great pains to have a halfway decent looking glove for my sword hand (although compromises had to be made there, too), but the glove for my shield hand was a welder’s glove. Practical but ugly.
I had a todo for „new shield glove“ since at least April 2016, but I didn’t quite get around to it. This weekend, after making a practice piece from artificial leather, I went for the real thing. I took some pictures to illustrate the process.
There are some „truths“ in reenactment which are rarely questioned, although maybe they should be. These are sometimes called „reenactorisms“, self-propagating myths that are perpetuated by the „monkey see, monkey do“ attitude that befalls reenactors, be they inexperienced or veterans.
A reenactor’s knot (image copyright The Jelling Dragon)
One of those truths is a trivially sounding question: How long were viking-age belts? We have come to accept that they had a buckle and a strap-end, and the strap-end hung about crotch to mid-thigh – 20 to 40 cm from the buckle. The strap was fed through the buckle and then knotted just behind it, hanging straight down. This is sometimes called „the reenactor’s knot“, and there doesn’t seem to be an awful lot of evidence for it. Apart from that, it is really impractical because you constantly have a strap-end dangling between your legs. 😉
So, an excellent reenactor and designer of bronze jewelry replicas, Burr Öhrström, took it upon himself to research the Birka graves for evidence of belts and buckles. I did the same tonight (oblivious of the fact that he already had done that) and would like to systematize the conclusions a little.
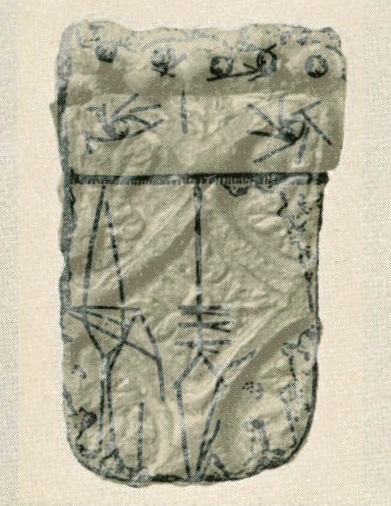
Helmets are a bit of a touchy topic for viking-age reenactors. There really aren’t that many finds from the „Viking lands“, i.e. Scandinavia, the British Isles and the Rus area of influence.
In the West, there’s the Gjermundbu helmet – an iconic helmet that is for many people the definition of a „viking helmet“. However, that helmet is a singular find, and it’s from Norway. From what is now Poland and Czech Republic, there are several nasal helmet finds (St. Wenceslas‘ helmet with Christ Savior nailed to the nasal, Lednicki lake, Olmütz, to mention a few) and the Rus have helmet finds from Cernigov (actually, several from that area, but I’ll cover that in a second), from Gnezdowo (a simple nasal helmet, as well as an „Eastern“ helmet with brass decoration) and some more (see below).
There’s a good overview over Russian helmets on Peter Beatson’s site, taken from Volume 3 of Kirpichnikov’s seminal anthology on Old Russian Arms and Armour.
There are very few finds of viking-age helmet remains in what is now Sweden, unfortunately. There is the Lokrume fragment from Gotland (which, due to its specific geography, is stilistically so far removed from mainland Sweden that it could well be a completely different country), and that’s pretty much it.
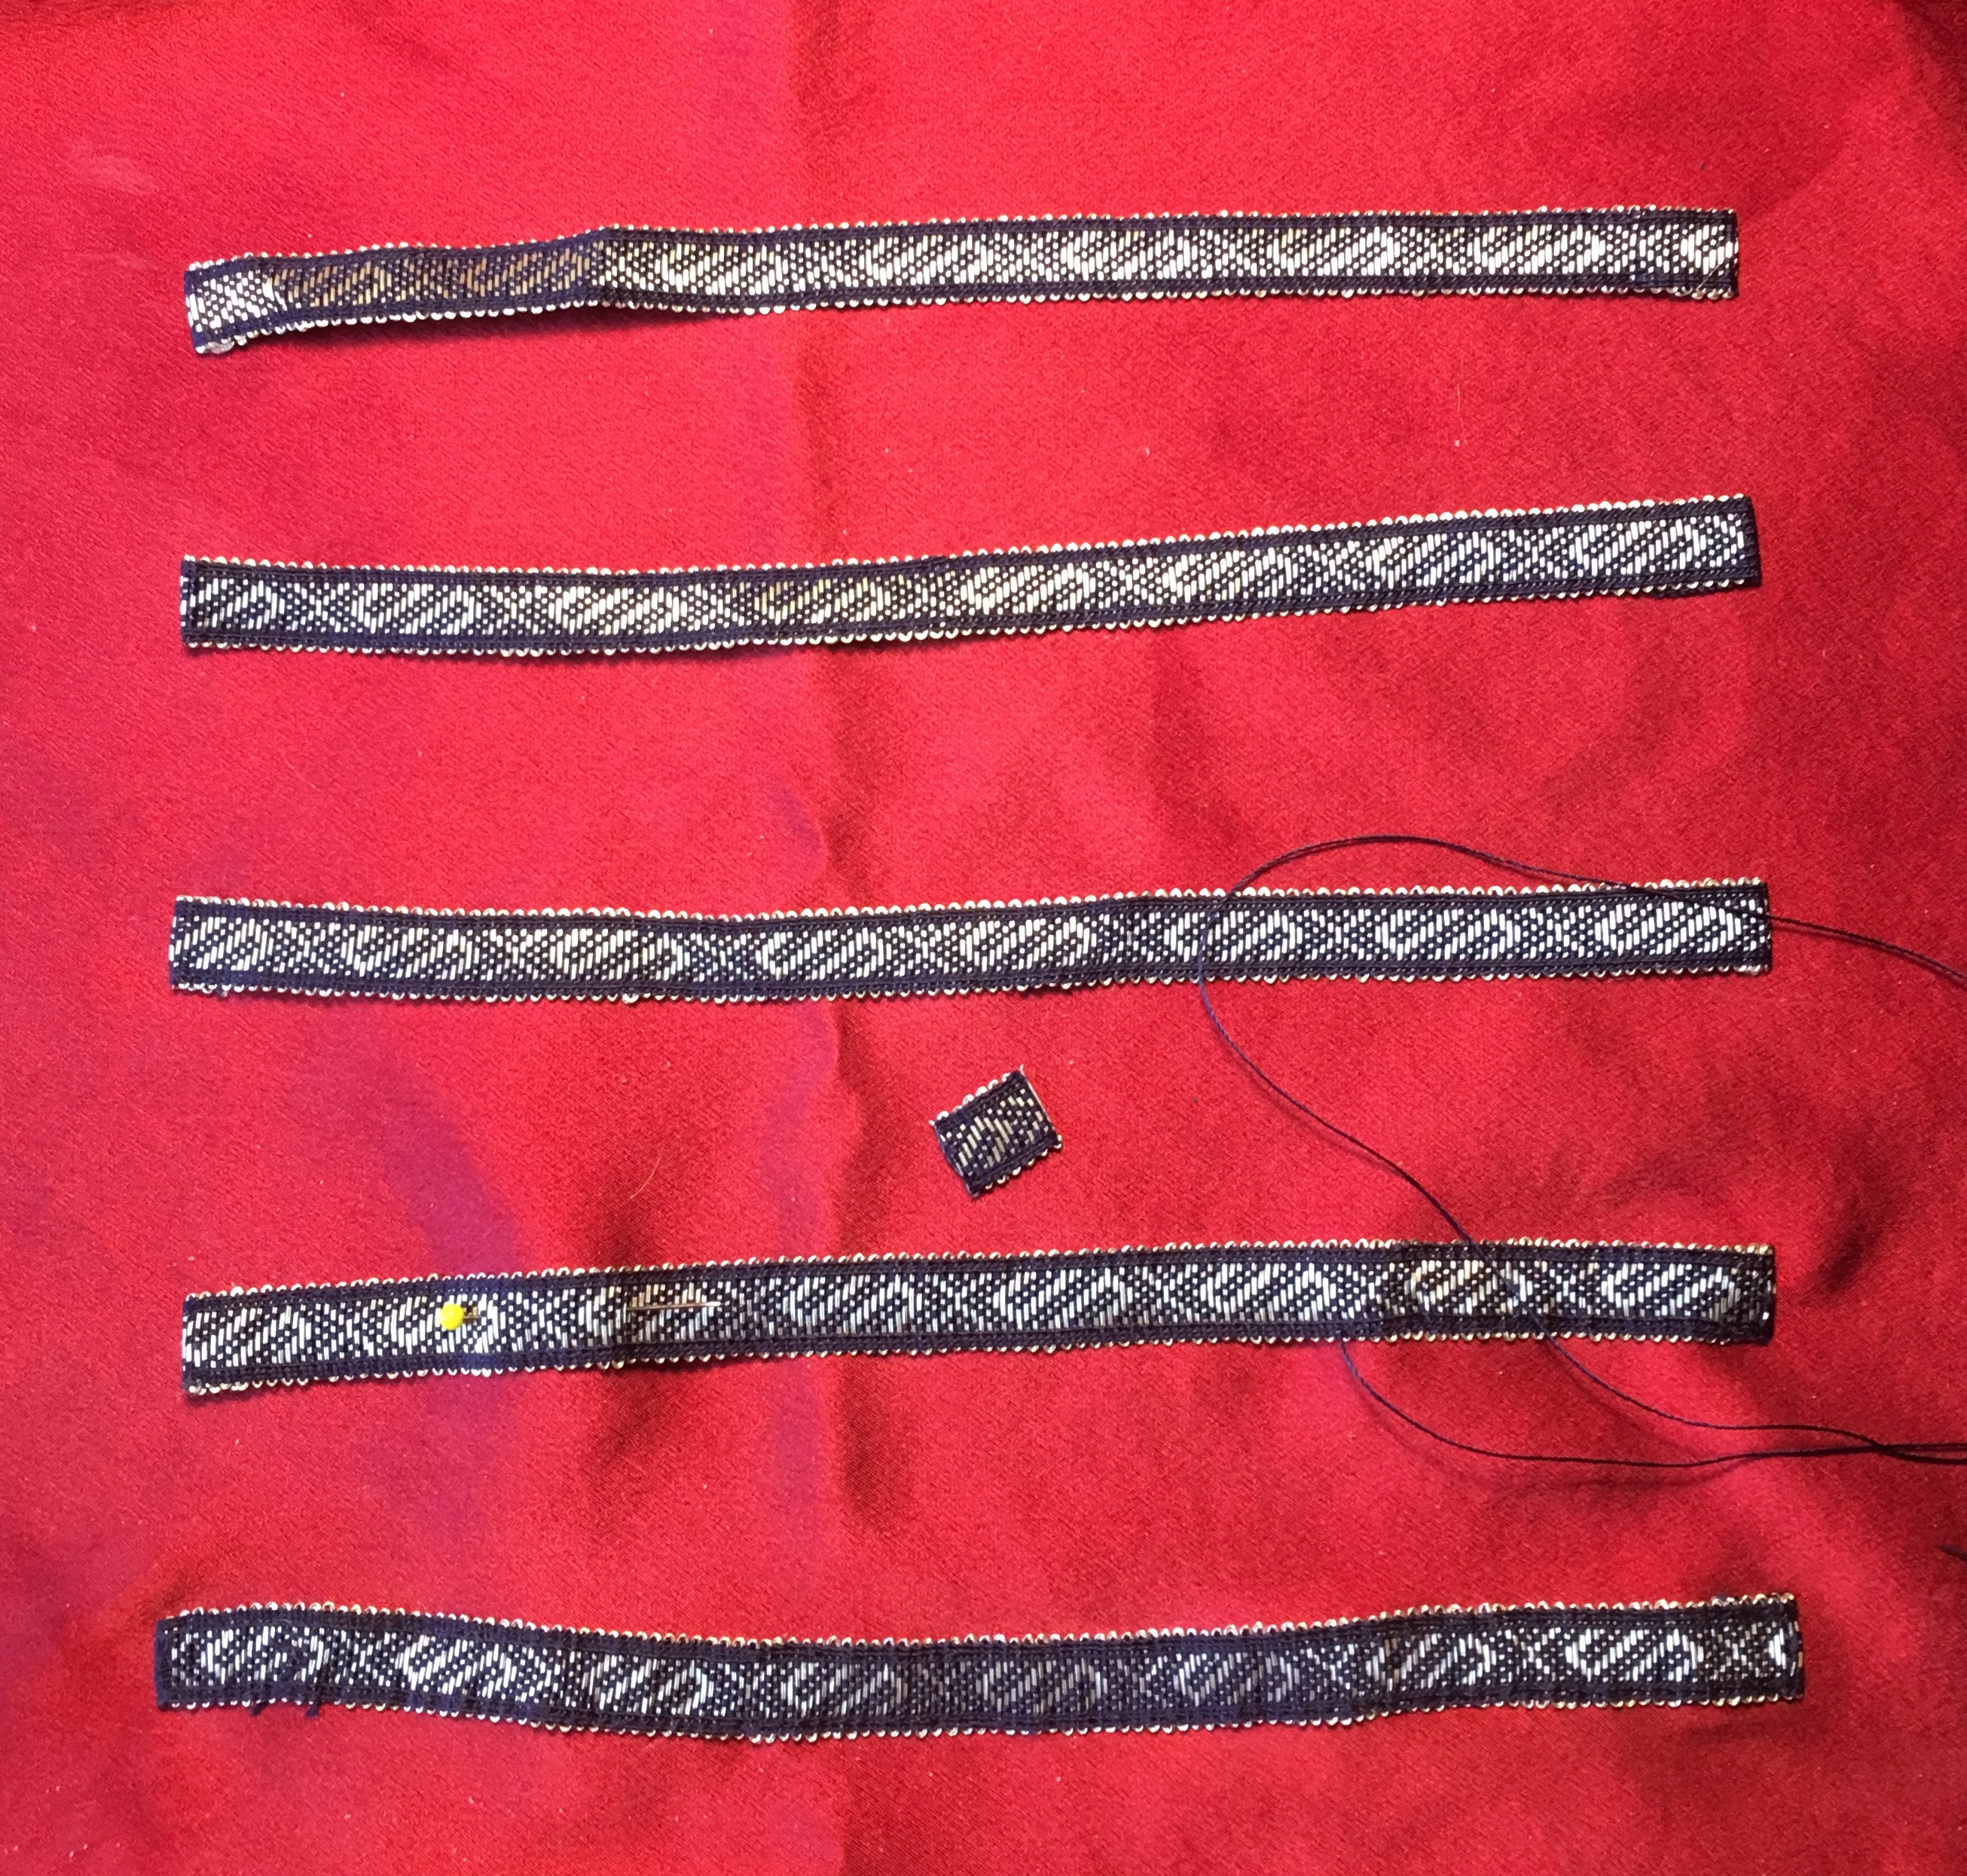
Des Mannes braune Wolltunika mit Wildseidenbesatz ist seine liebste Tunika – aber leider nicht so richtig authentisch. Die Wildseide wäre in Birka vermutlich als Tischdecke verwendet worden (gefundene Kleidungsseide war sehr, sehr fein verarbeitet und nicht von der groben, „rustikalen“ Art wie Wildseide typischerweise ist) und die Besätze sind auch etwas zu breit. Aber sie hat lange gehalten und wird auch sicher nicht einfach so aufs Altenteil geschickt.
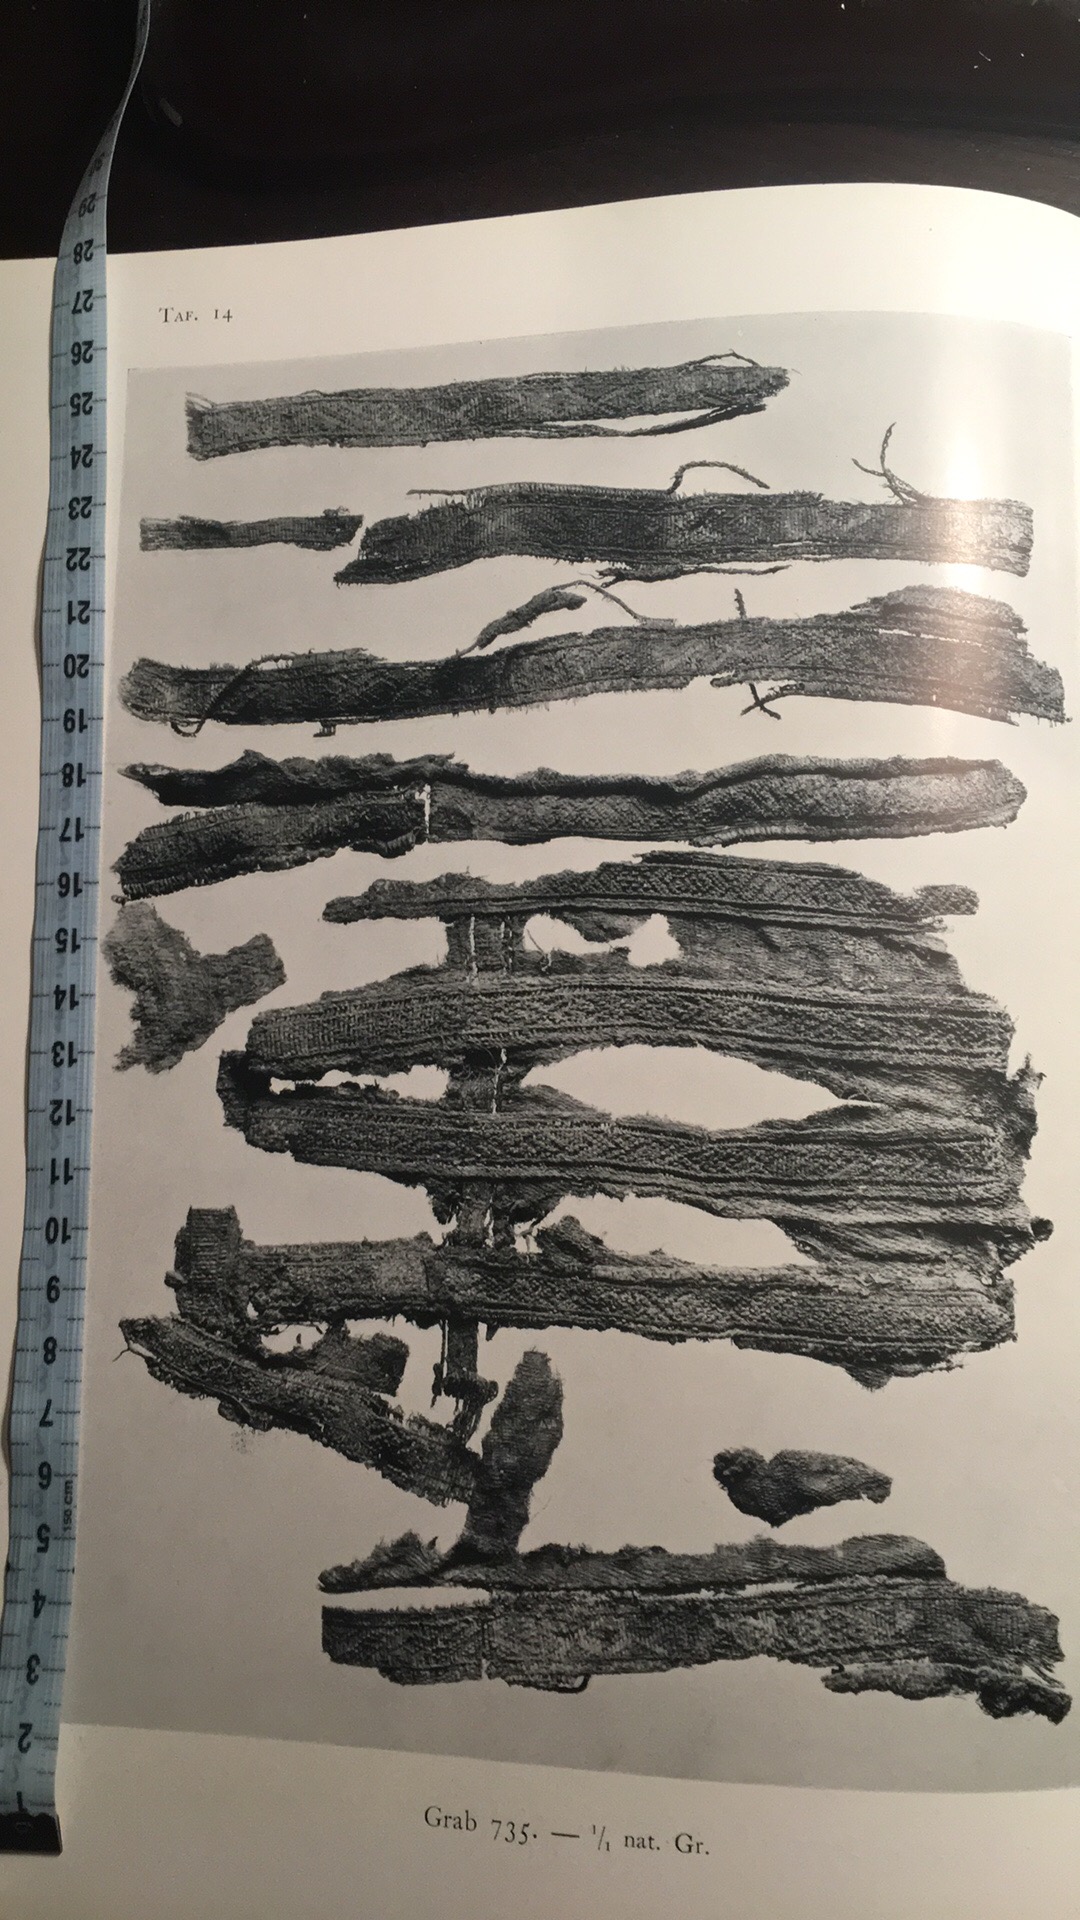
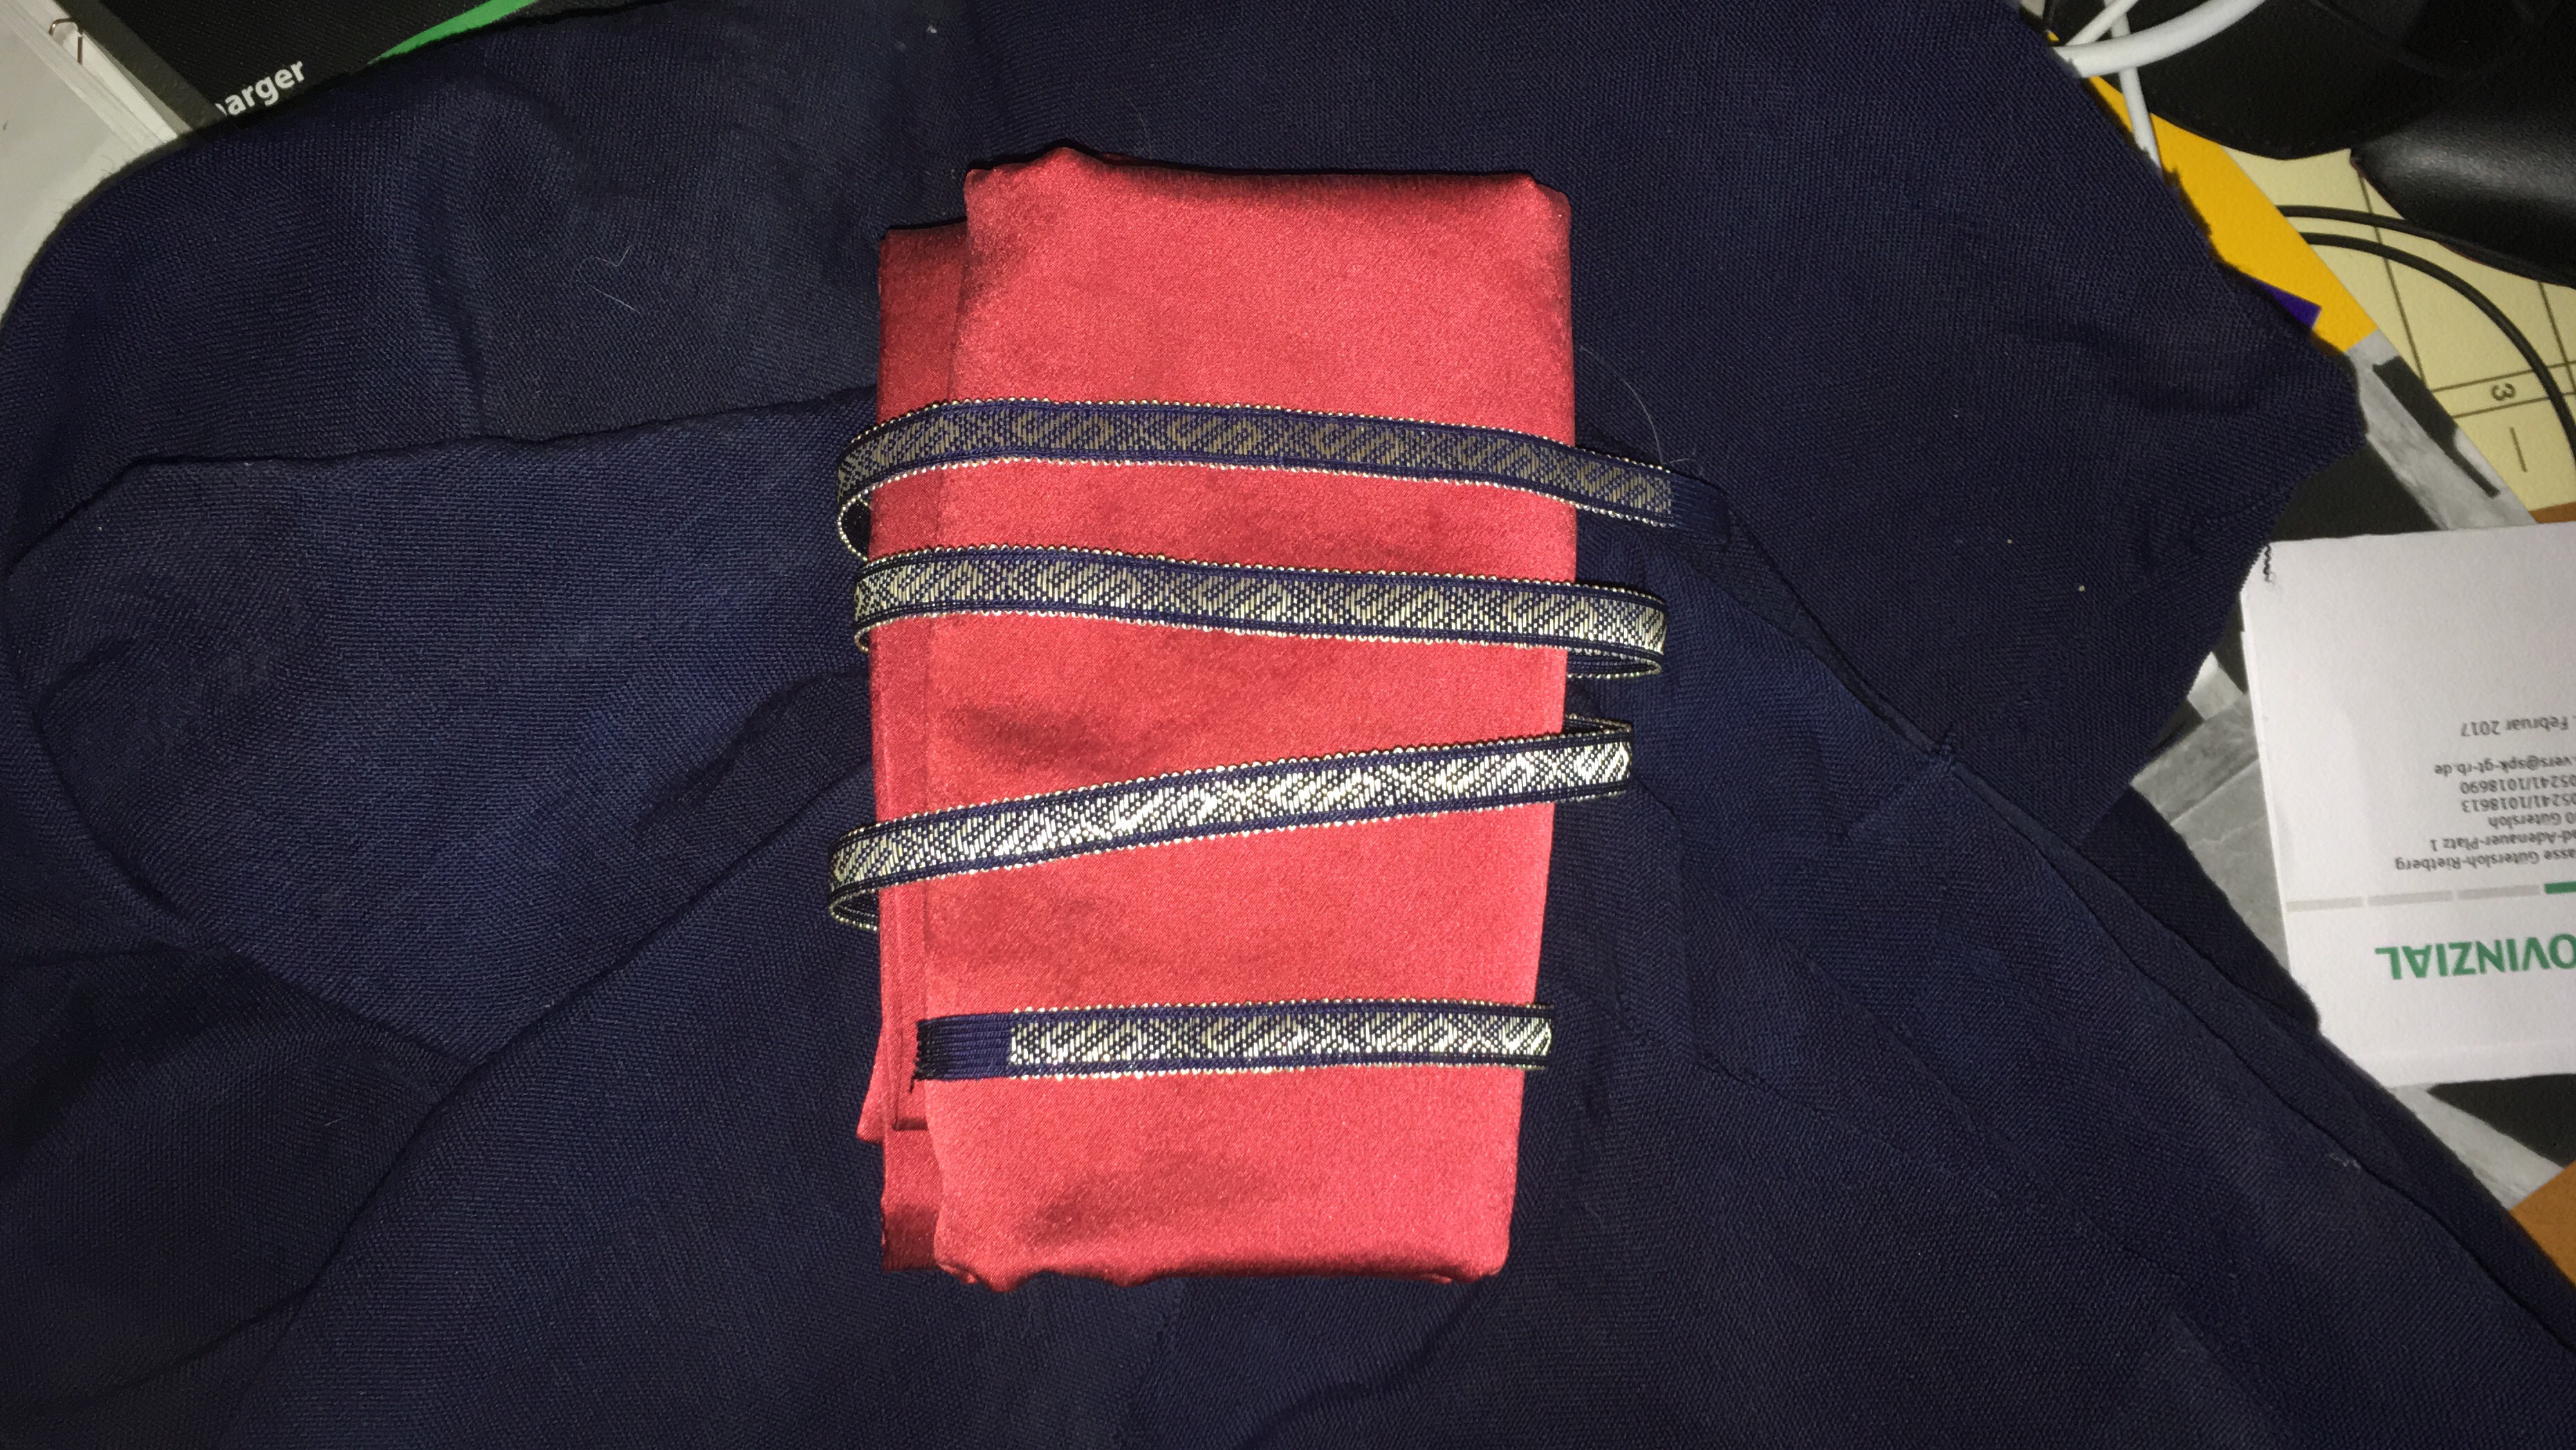
Über die Jahre reifte der Plan, mal was Neues zu machen. Durfte ruhig schick sein, aber nicht überkandidelt (und nicht zu weit jenseits des Fundguts). Broschierte Seide, wie sie derzeit modern ist, schied also aus. Nach längerem Suchen entschied ich (wenn ich die ganze Zeit von mir in der dritten Person schreibe, werde ich rammdösig) mich für eine blaue, indigogefärbte Wolle von Jörg und chinesische Seide von Kaptorga, die ich allerdings in letzter Minute gegen eine rotholzgefärbte Seide von Susan ausgetauscht habe. Als zusätzlichen Schmuck habe ich eine sehr schöne Reproduktion der Borte B13 aus Birka, Grab 735 erworben. Die ist als einziger Bestandteil der Tunika rein „chemisch“ gefärbt.
Die Zutaten das erste Mal zur Farbprobe vereint.
Der Zuschnitt der Tunika war für mich die größte Hürde – mit dem Zuschneiden von Kleidung, besonders bei hochwertiger Wolle, tue ich mich noch immer schwer. Irgendwann waren dann alle Stücke ausgeschnitten und ich habe jedes einzelne mit waidgefärbtem Wollgarn handvernäht. Das dauerte seine Zeit und nach der Aktion war auf einmal April. Mittlerweile war die Borte da und die Nervosität wuchs. Ich hätte mal mehr als 1m bestellen sollen.
Wer mißt, mißt Mist.
Erste Stellproben wurden mit diversen Facebook-Gruppen besprochen. Das Ergebnis war nicht eindeutig.
Machen wir’s so? Sieht seltsam aus und ich habe viel Borte verschenkt.
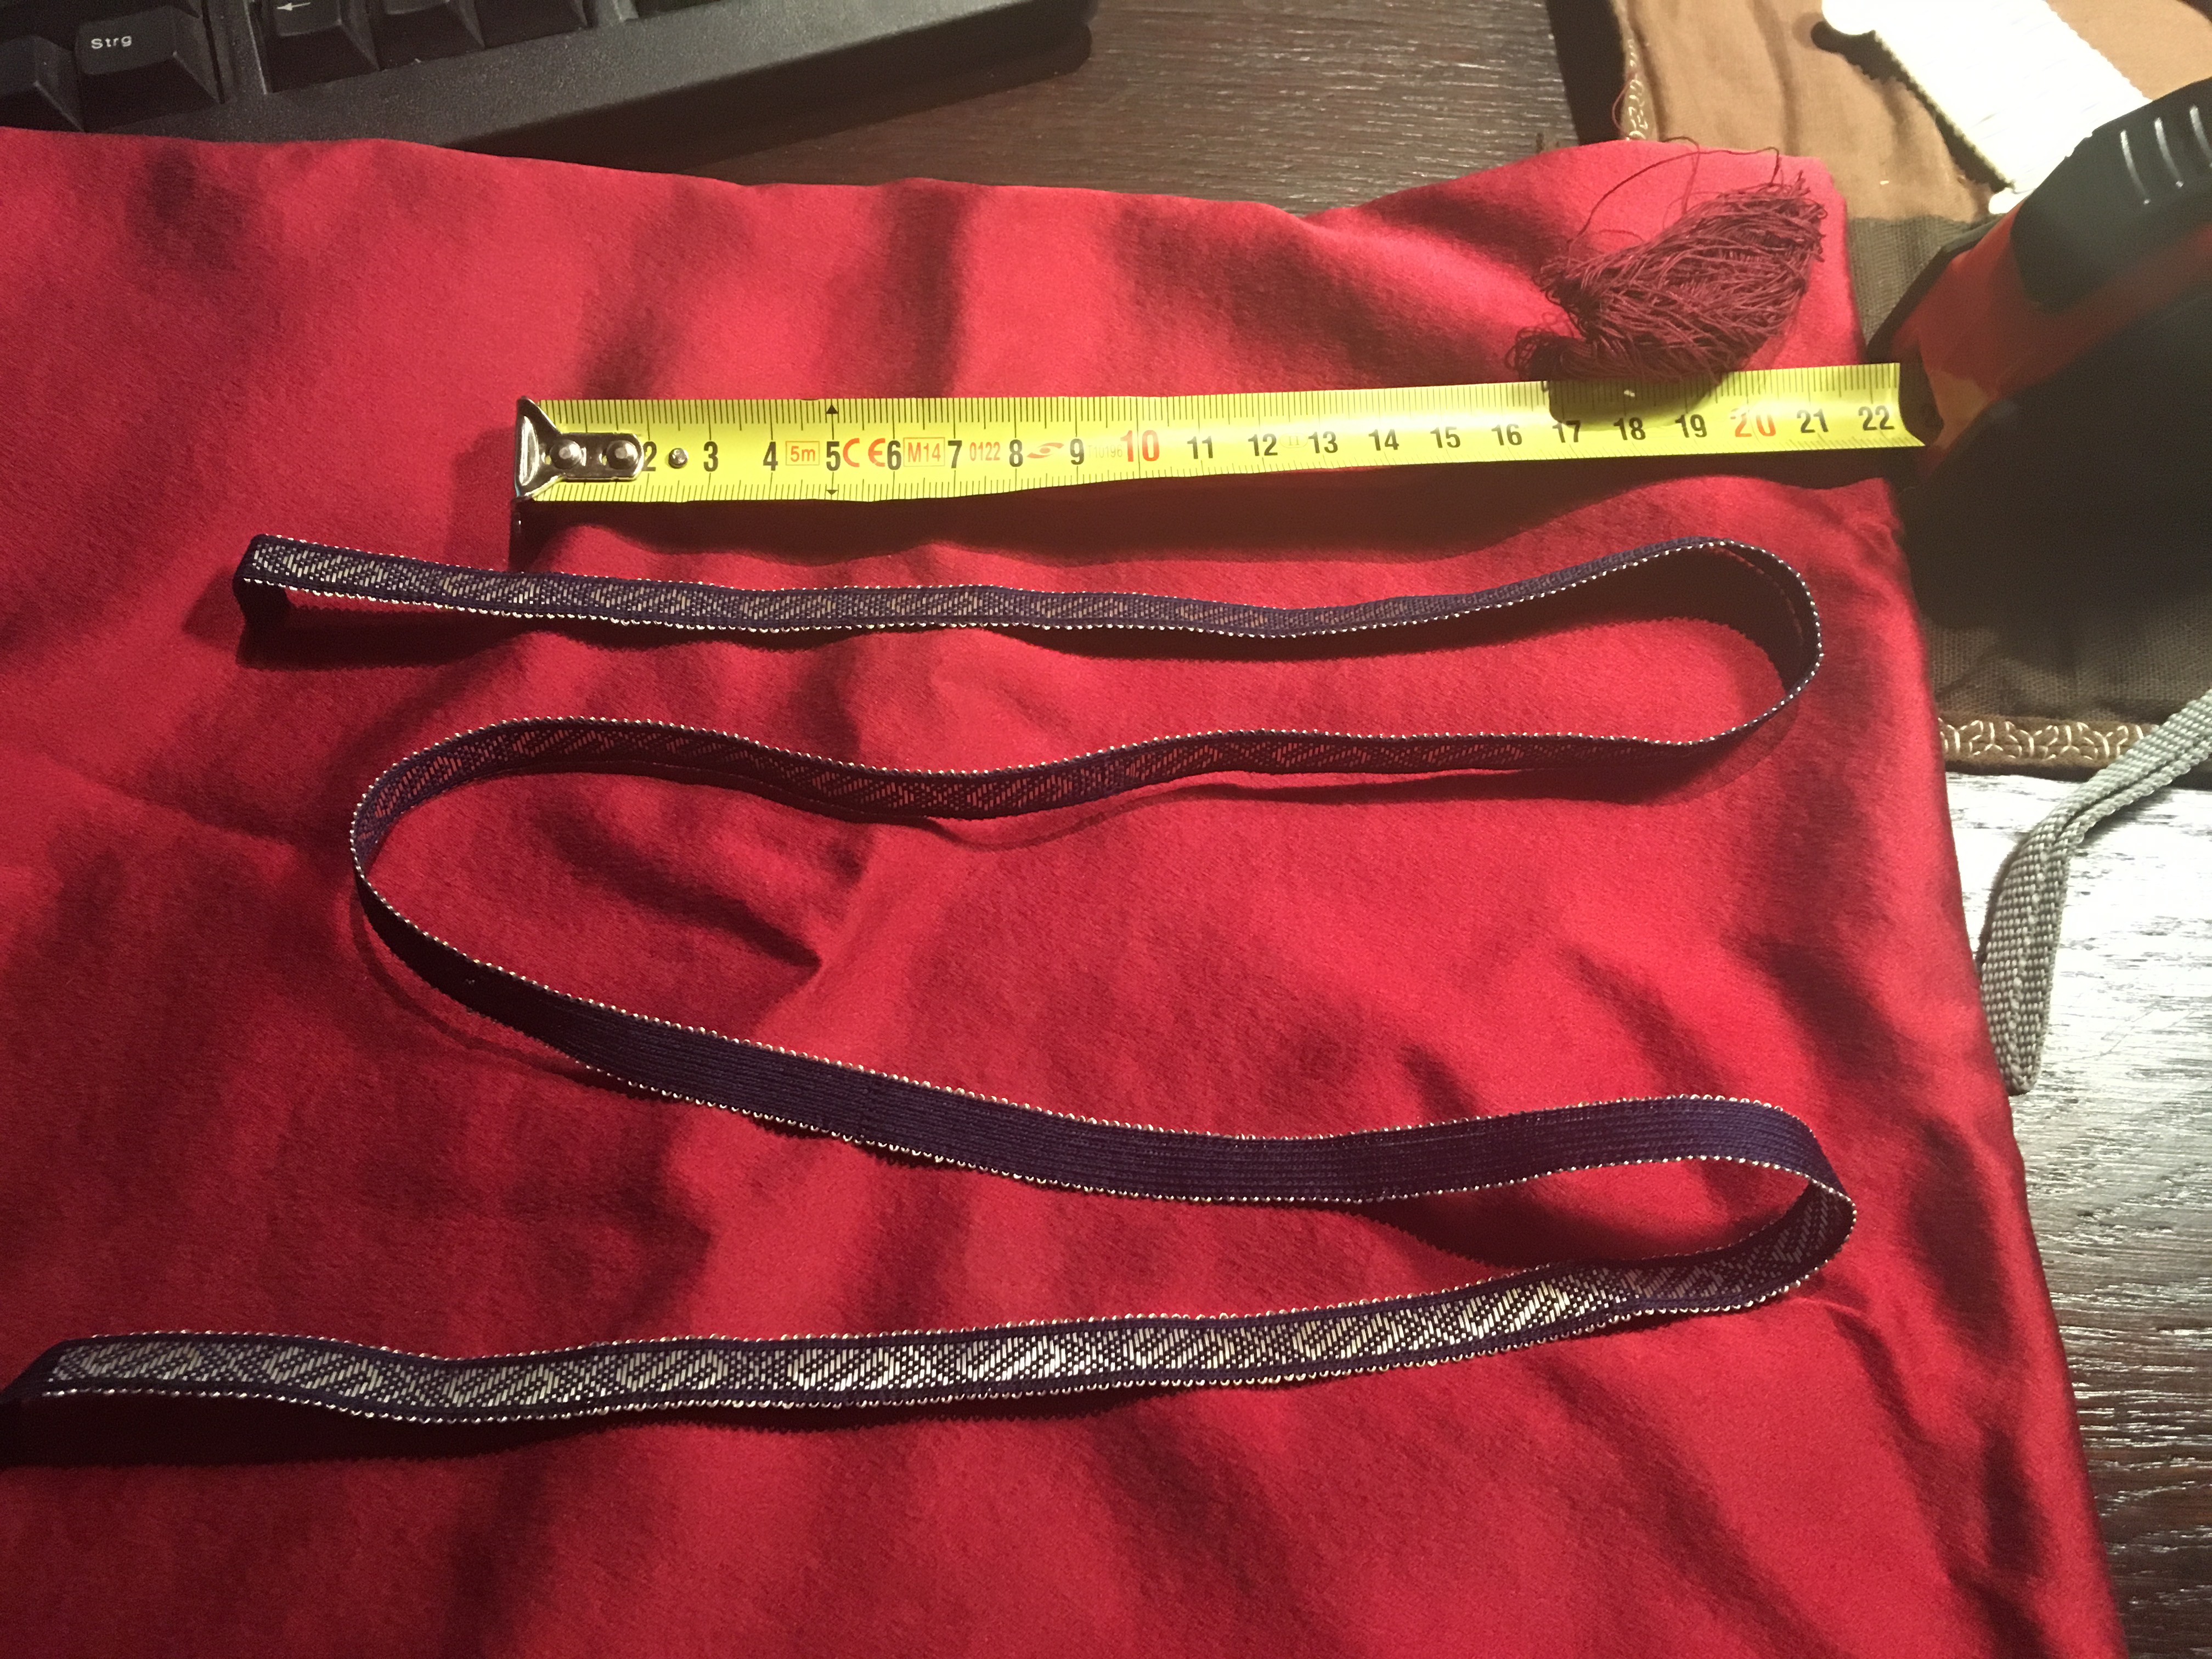
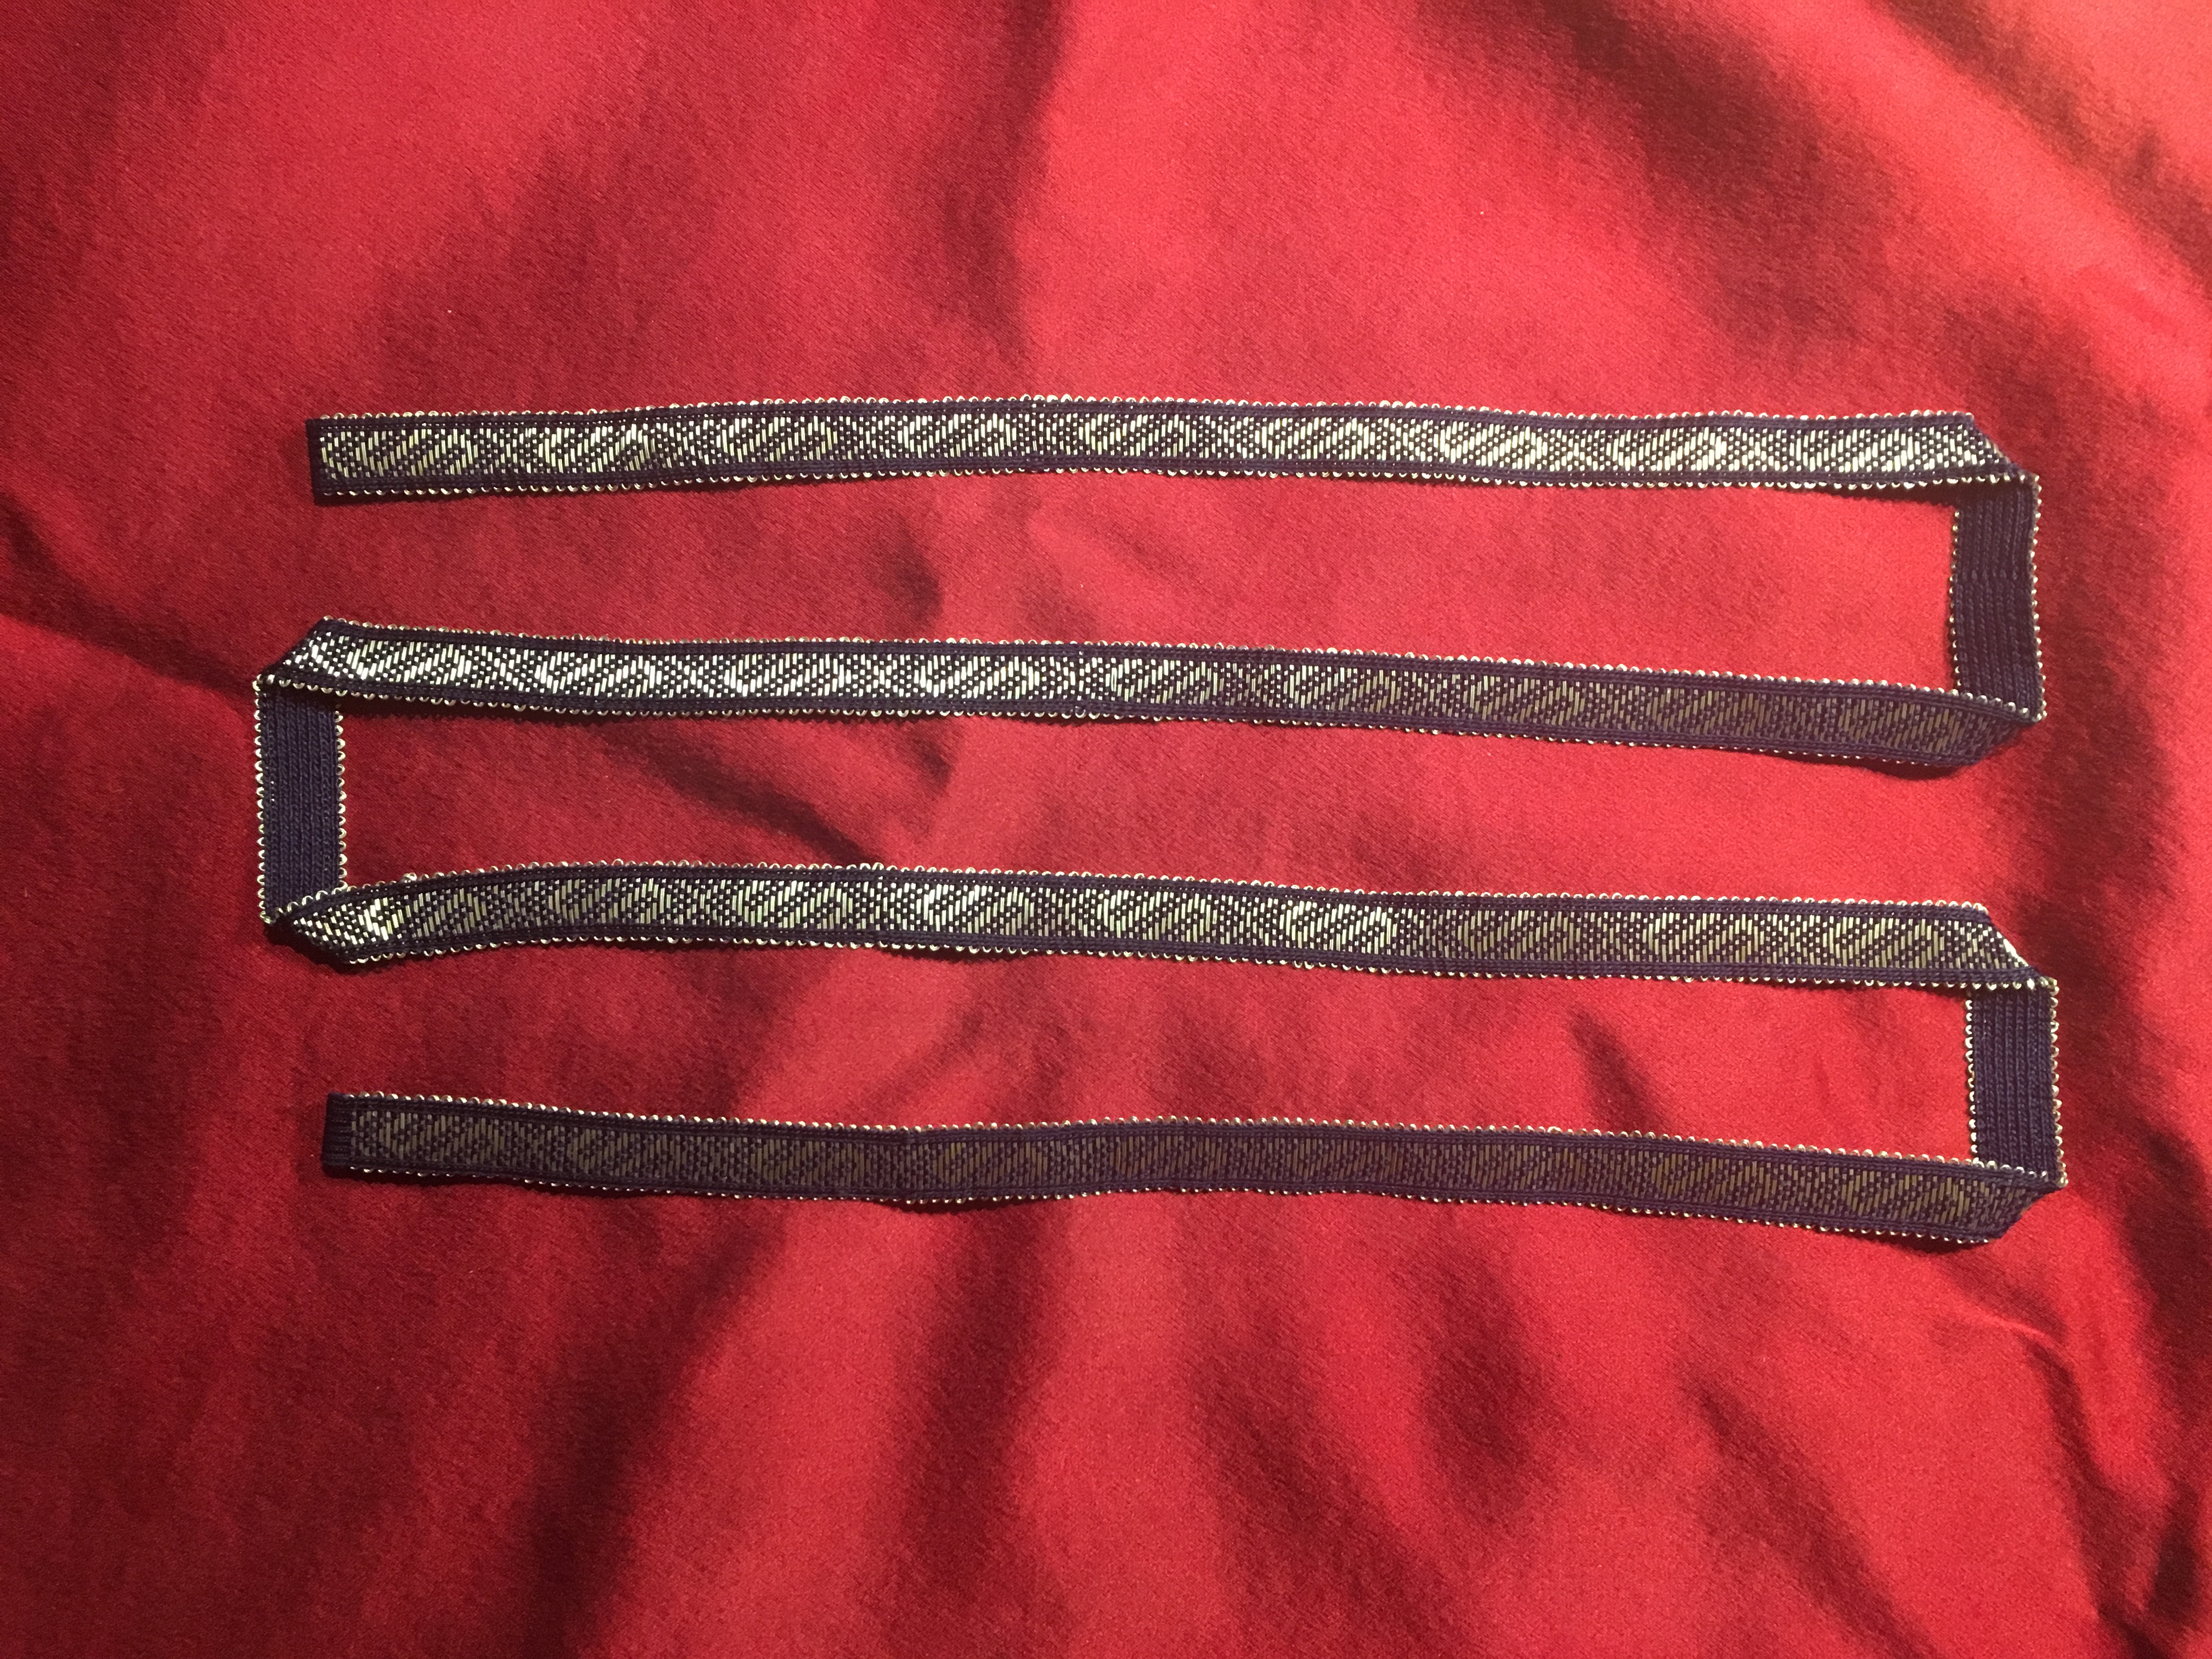
Nach längerem Probieren habe ich die Borte dann in 20cm-Stücke geschnitten und die Enden umgelegt und fixiert.
Langsam wird es ein Bortenbesatz…
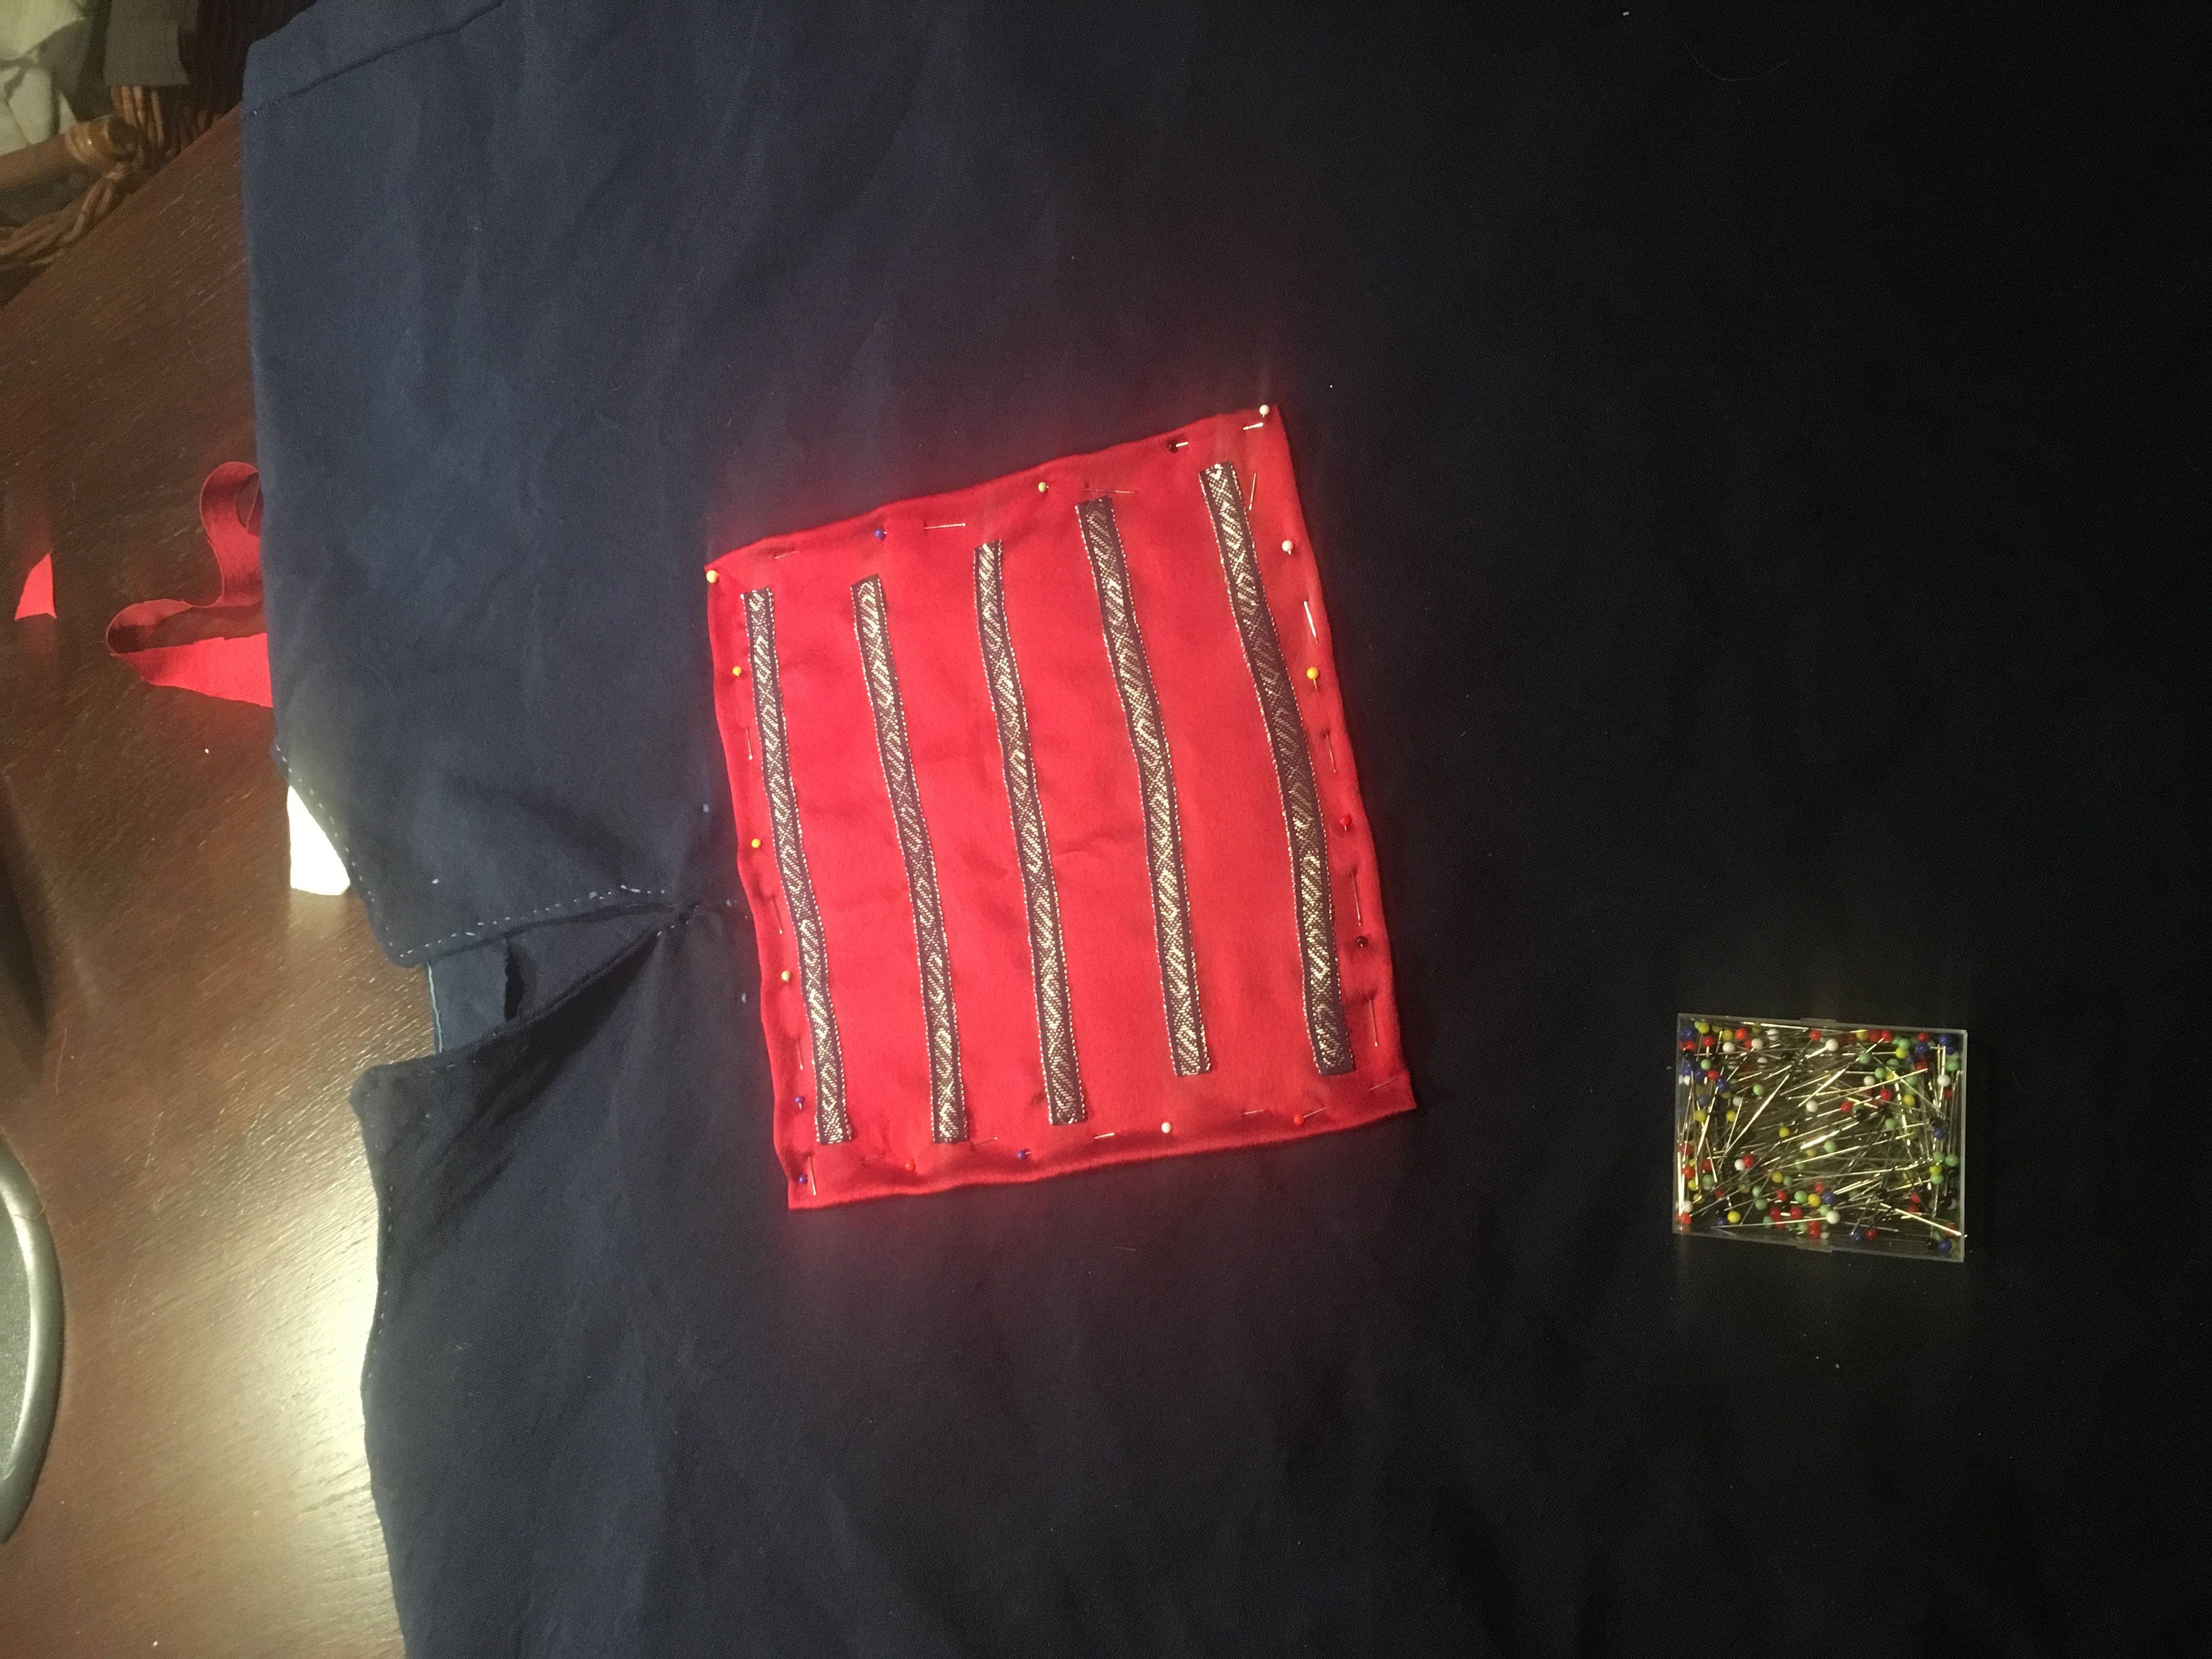
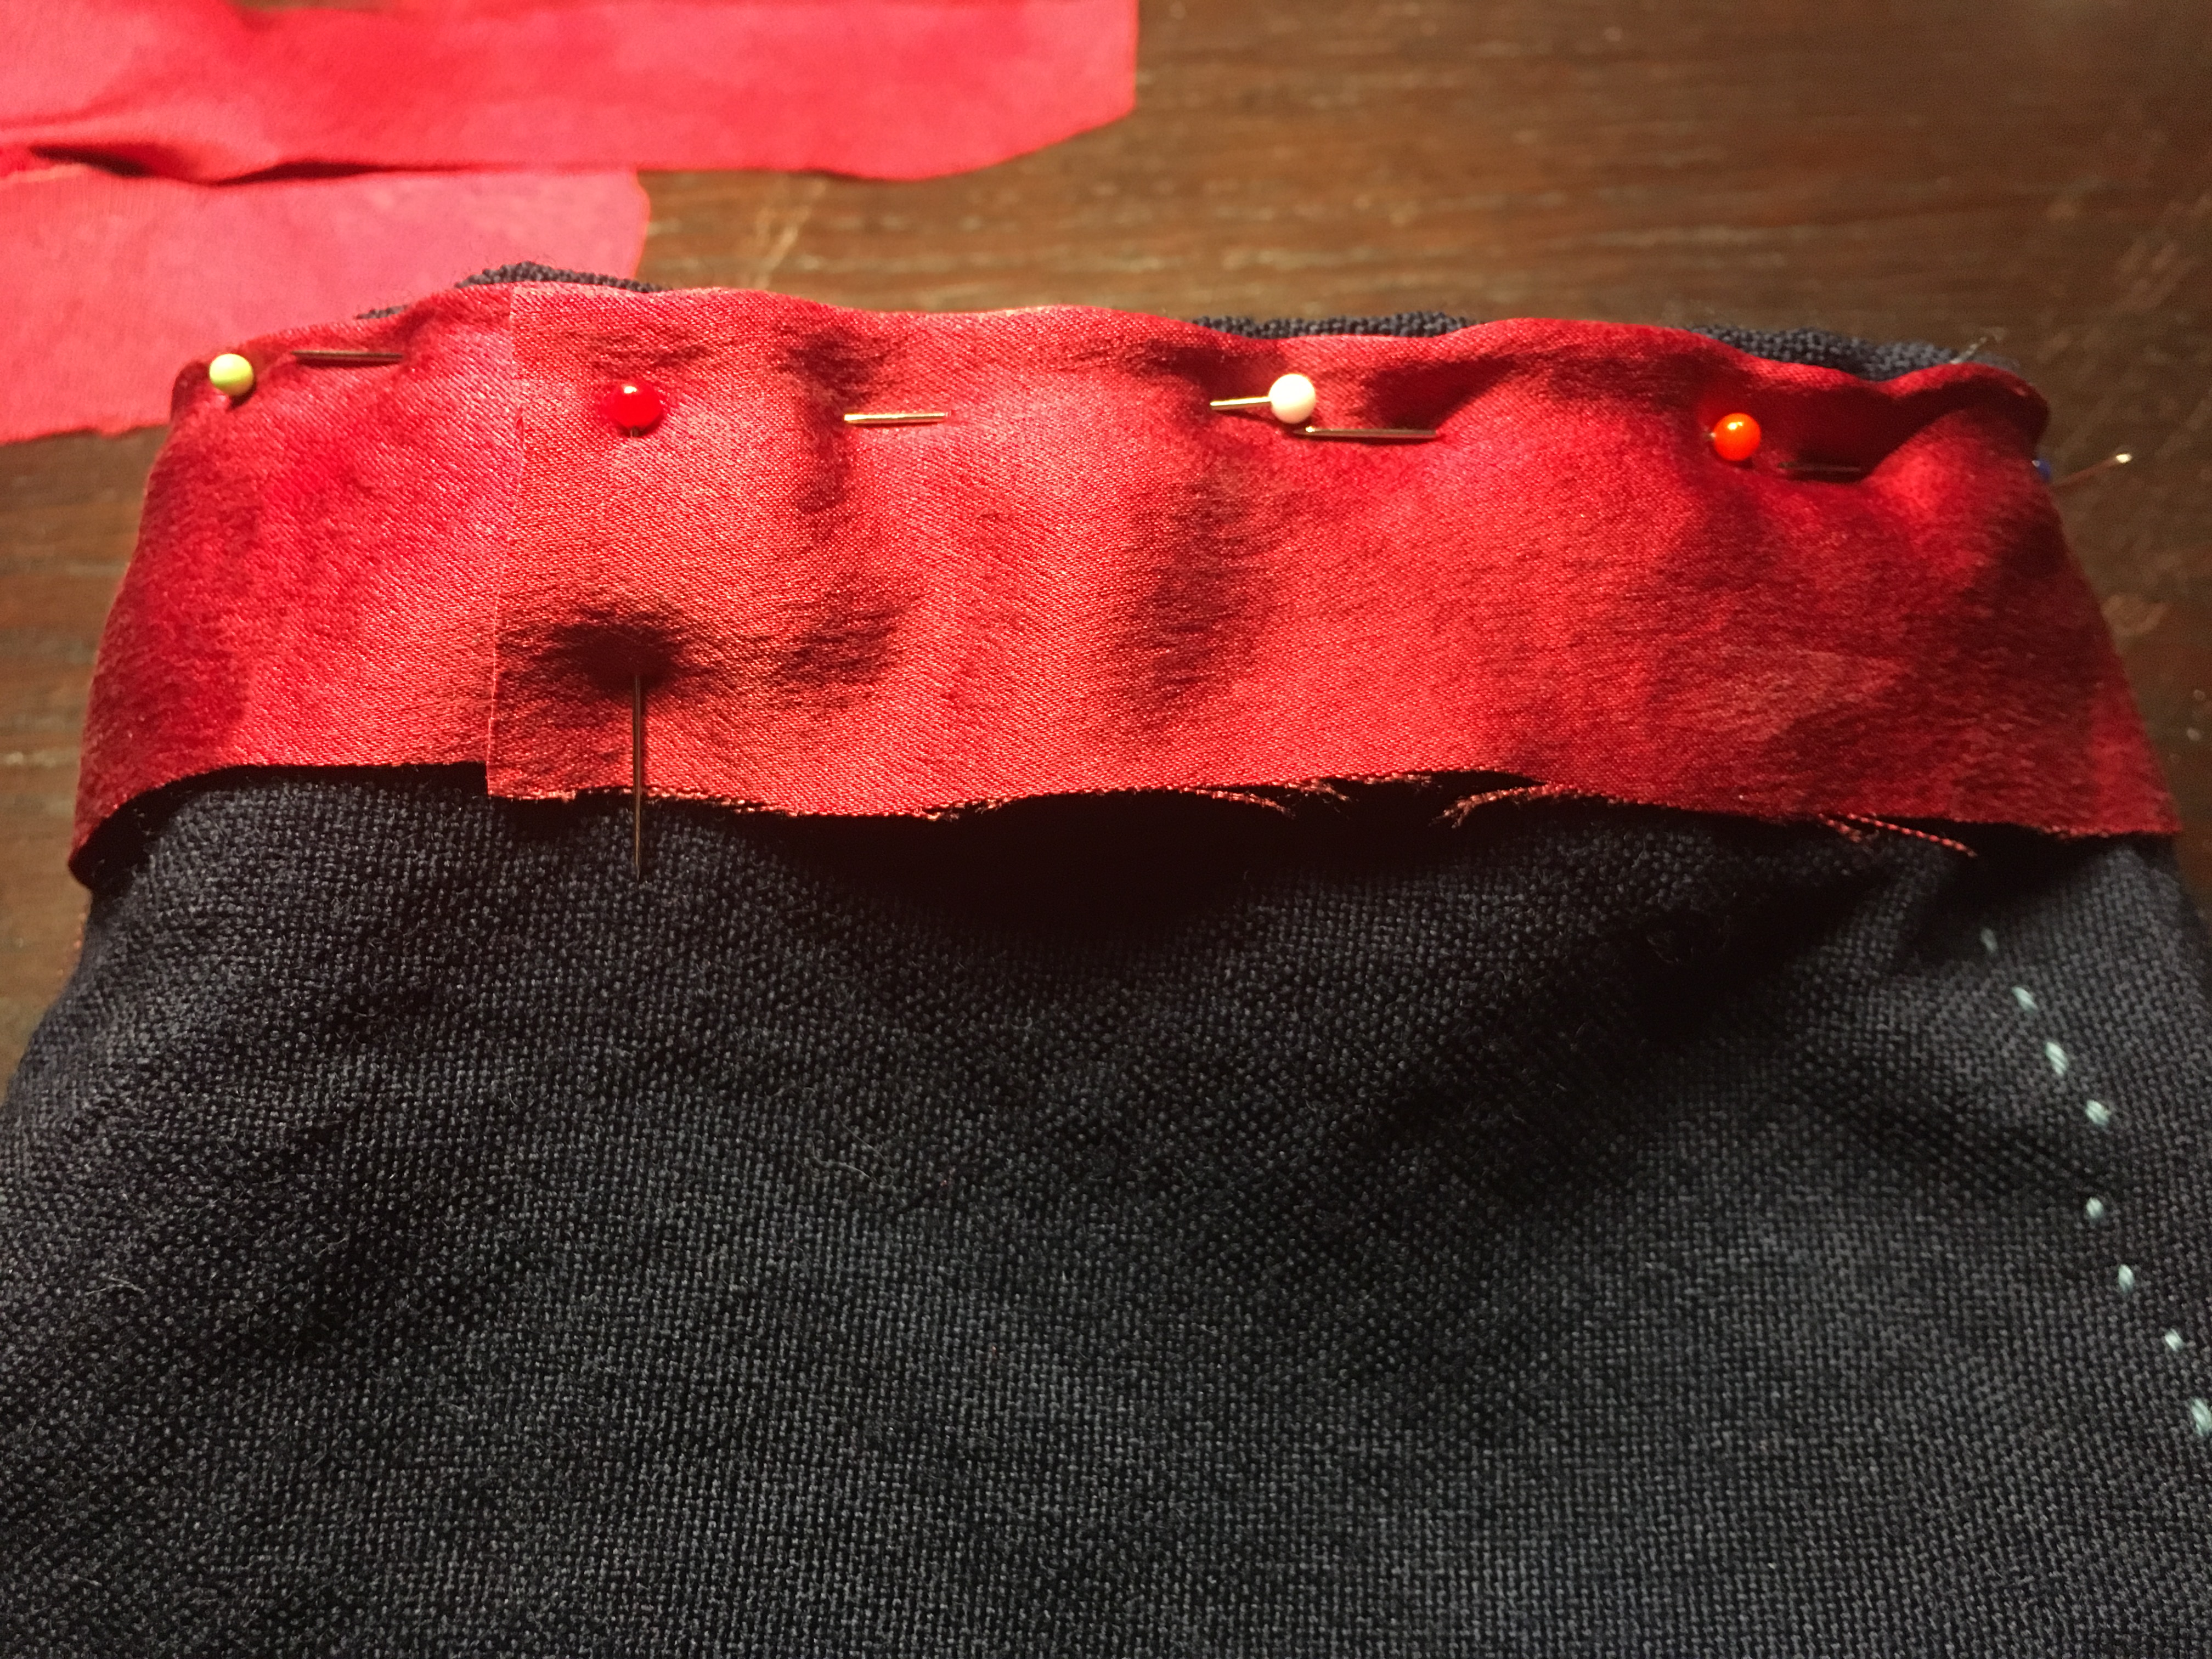
Das Ganze mußte dann „nur noch“ auf die Seide als Trägermaterial aufgenäht werden – im Fund in Bj735 war auch die Borte auf ein Stück Seide genäht. Das ergibt bei einem so teuren Besatz auch Sinn, denn war das Kleidungsstück, auf dem er saß, kaputt (oder unmodisch geworden), konnte der Besatz abgetrennt und weiterverwendet werden.
Beim Nähen von silberner Drahtborte auf die Seide wurde es lustig. Mit Stecknadeln fixieren ist bei Silberdraht vs. Seide ein Alptraum (das eine Material ist hochflexibel, das andere so starrsinnig wie ein Ostwestfale), also habe ich mir von Lisa den Tip geholt, die Borte schnell mal festzusteppen. Und dann ging’s auch mit dem Vernähen.
Nächster Schritt: Seide auf Wolltunika nähen. Das war beim Quadrat mit der Borte noch einigermaßen friemelig, aber als ich mich vom Gedanken verabschiedet habe, auch nur eine wirklich gerade Kante zu haben, ging es dann.
Wie nennt man Rechtecke mit konvexen Seiten?
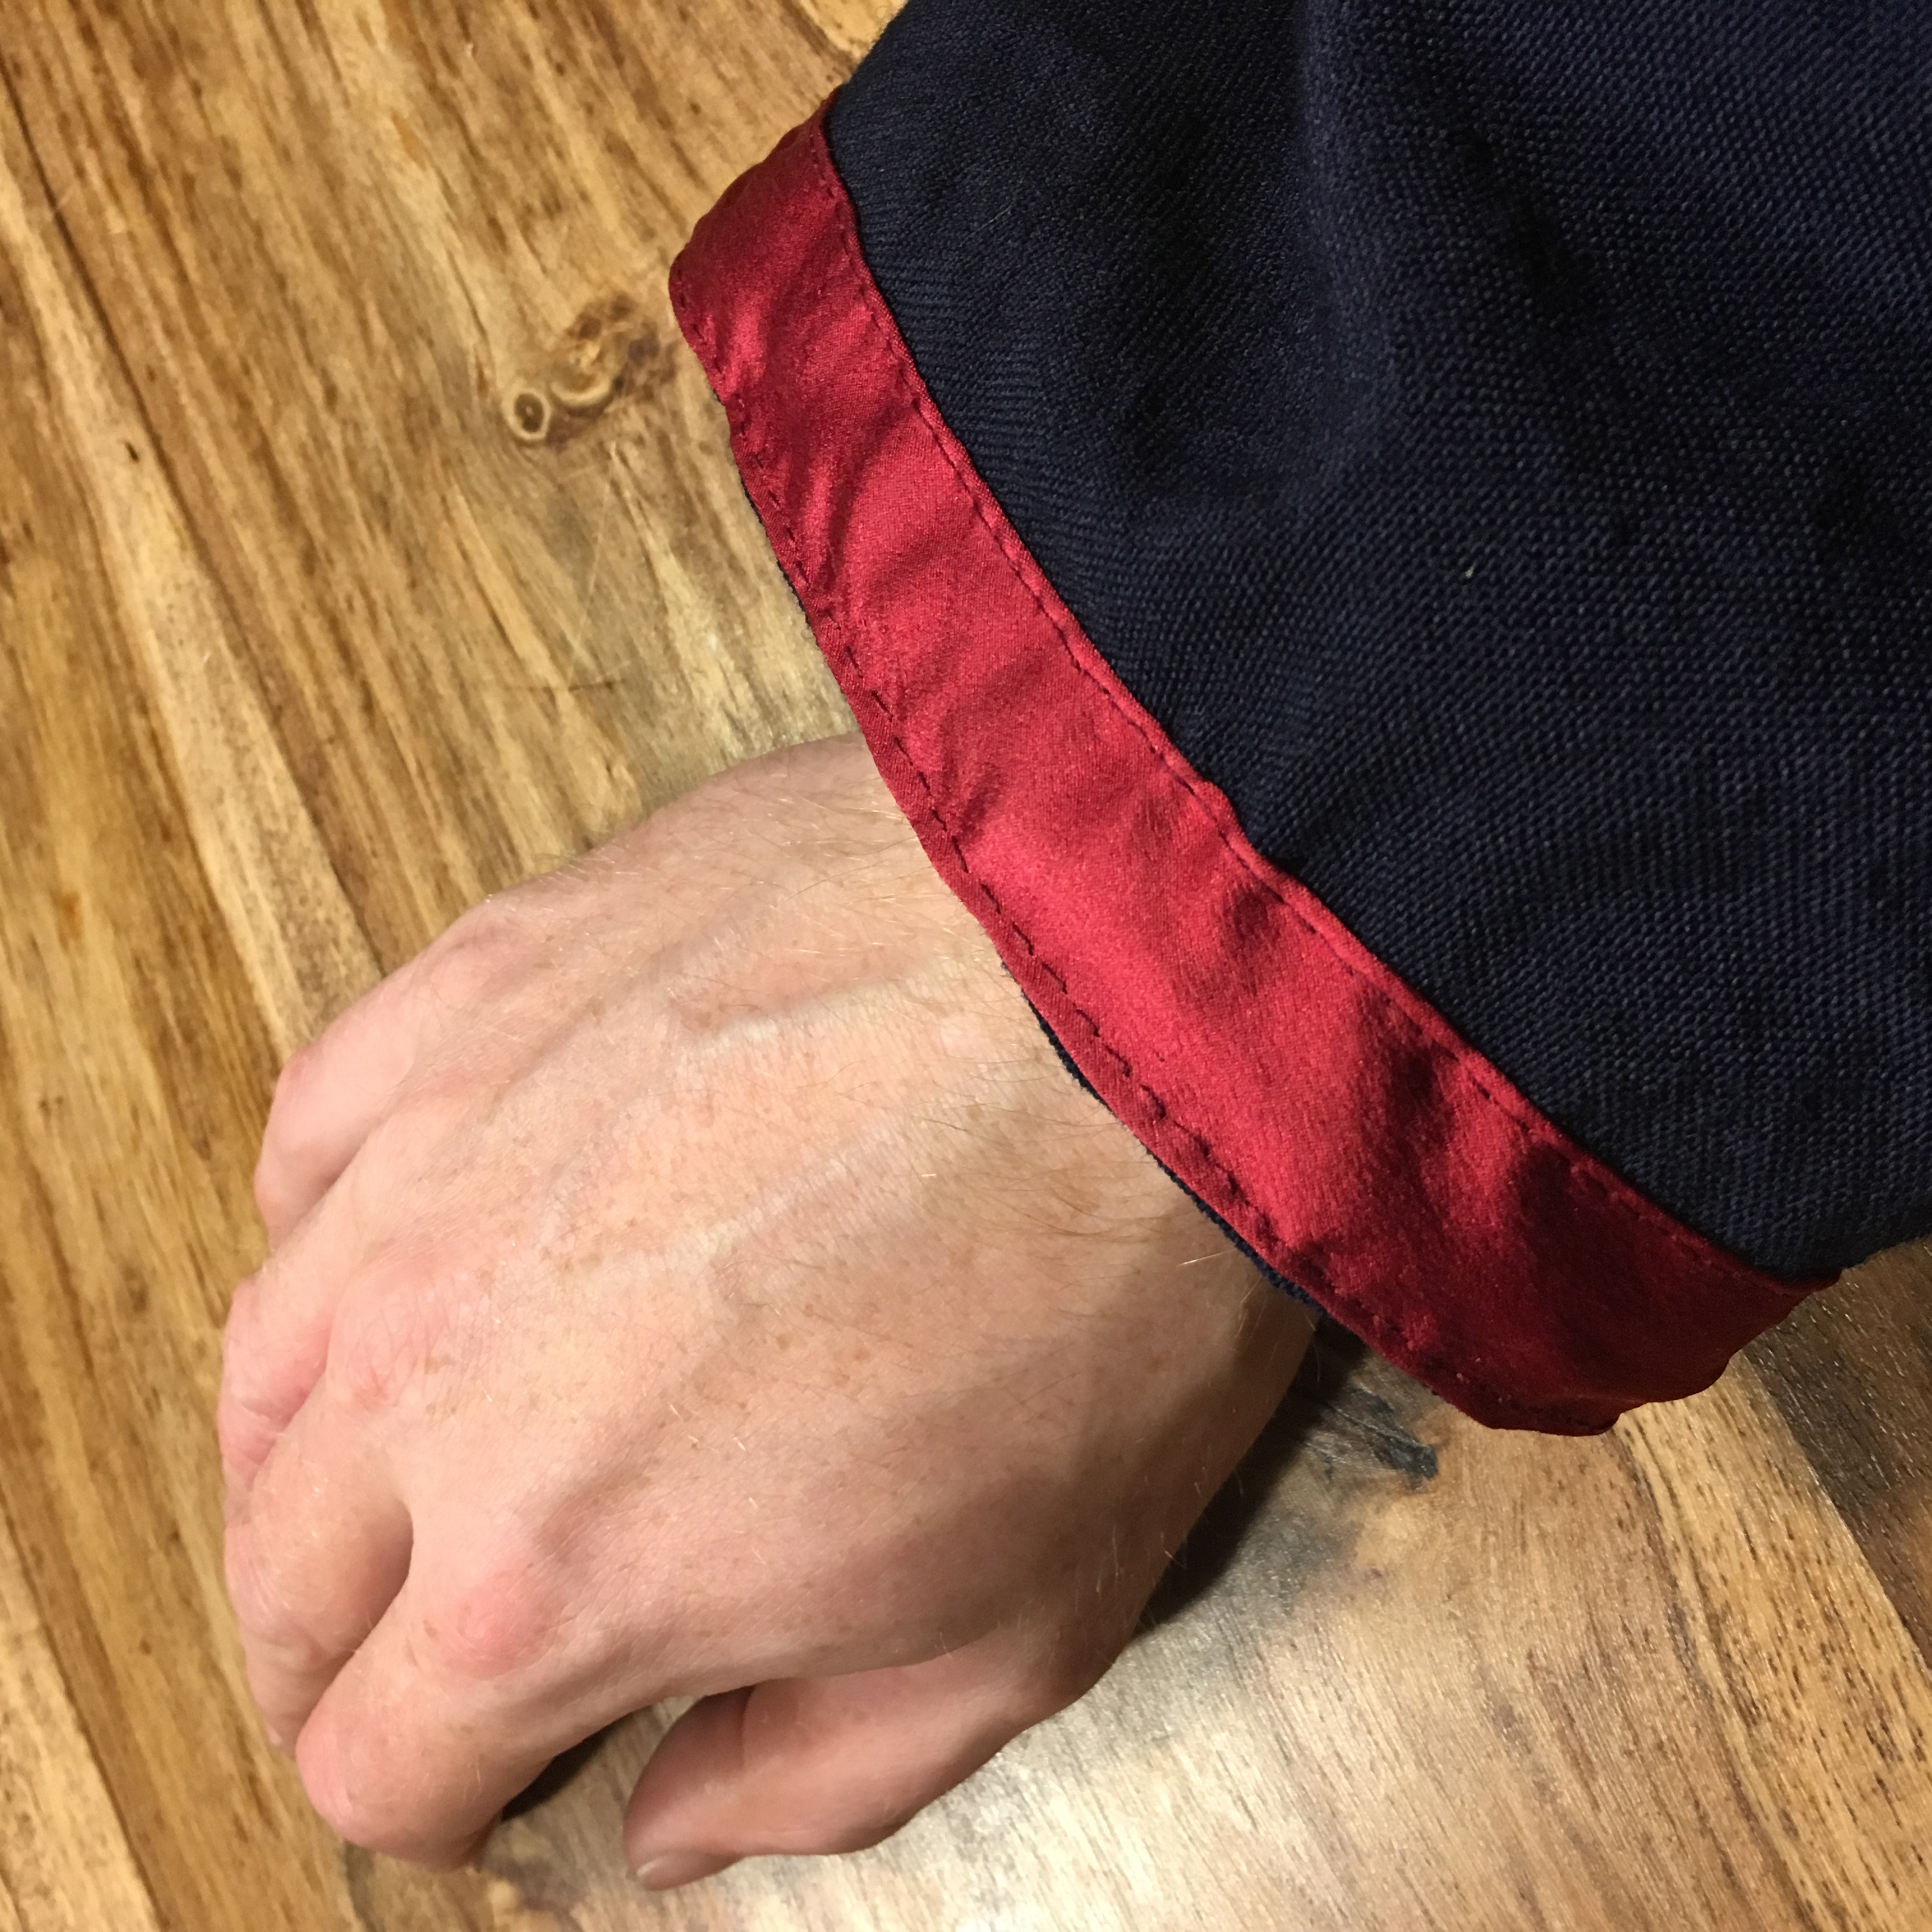
Danach fehlte noch ein bißchen Besatz für die Ärmel – das war dann verhältnismäßig einfach. Die Besätze sind 2cm breit, was vermutlich sogar schon am oberen Ende für die wikingerzeitlichen Besätze war (1cm oder weniger war vermutlich nicht unüblich) – aber ich habe nicht die handwerklichen Fähigkeiten, um mit einem so dünnen Besatz klarzukommen. Noch nicht.
Zum Vernähen der Seide habe ich glücklicherweise Seidengarn aus derselben Färbung verwenden können, das praktisch überhaupt nicht sichtbar ist. Trotzdem habe ich mit extra kleinen Stichen (wieder: Für meine Verhältnisse, die Originalfunde sind teilweise mit kleineren Stichen vernäht als moderne Maßhemden!) genäht.
Abstecken… annähen…
Erster Ärmel fertig.
Detail der Naht
Und dann war irgendwann der letzte Faden versäubert und die Tunika fertig. Um die Halsöffnung schließen zu können, habe ich noch einen Kaftanknopf nebst Schlaufe angenäht, das ist aber erstmal eine temporäre Lösung.
Und so sieht die fertige Tunika aus.
Die fertige Tunika
Detail des Besatzes
English summary
I made a new tunic for myself, based on finds from Birka. The wool is indigo dyed tabby, hand sewn with indigo or woad dyed wool thread. The silk used is redwood dyed fine silk, sewn onto the base wool with redwood dyed silk thread.
The braid is based on Birka B13 braid from Bj735 and sewn into 5 „ribs“ (original had around 8, and some diagonal crossing) onto the silk. The braid is made from silk warp and silver weft, probably not indigo but artifical dye, but very close in colour tone.
[I think there’s a demand for an english version of this article, so I’ll translate it.]
This blog suffered from our preference of facebook lately. That has many reasons, one of them being bigger intensity and quantity of interaction (albeit not quality!). We have had a lot of discussions about reenactment topics, many of them tiring, most very interesting. One of the more tiresome topics regards a „reenactorism“, a self-perpetuating myth that has been created by reenactors and is now often taken for a fact.
In an irregular manner, I will pick up some of these reenactorism and give them a fact check.
Today: The Varangian Guard. Legguard, not Guardsman. Actually, leg and arm guard, not Guardsman. Just a couple days ago, I saw someone selling „varangian armguards“ online, and I shivered. These devices are the impersonification of reenactorisms for me. But let me begin at the beginning…. or actually at the end.
Dieses Blog ist nicht zuletzt inhaltlich in den letzten zwei Jahren sehr ins Hintertreffen geraten, weil wir uns deutlich mehr auf Facebook als hier engagiert haben. Das hat viele Gründe, einer ist aber sicher die doch höhere Intensität und Quantität (wenn auch vielfach nicht Qualität) des Feedbacks. Wir haben viele interessante, teilweise auch ermüdende Diskussionen zu Reenactment-spezifischen Themen geführt. Eines davon sind immer wiederkehrende, aber nicht mit Fakten zu untermauernde Mythen des Reenactor-Daseins – die sogenannten „Reenactorismen“ oder „Reenactorisms“.
Ich werde in den nächsten Monaten immer mal wieder einige dieser Themen, die auf Veranstaltungen oder in Online-Diskussionen häufig wiederkehren, aufgreifen und auf ihren Wahrheitsgehalt abklopfen.
Heute: Die Warägerschiene. Just heute morgen sah ich im Facebook-Feed die Anzeige eines Händlers aus der Wikiszene, in der „Waräger-Armschienen“ zum Verkauf standen und bekam eine Gänsehaut. Handelt es sich bei diesen Gerätschaften doch um einen Gegenstand, der den Inbegriff eines Reenactorismus‘ darstellt. Aber von vorne…