One of the parts of my kit that I was kind of ashamed for was my shield glove. I took great pains to have a halfway decent looking glove for my sword hand (although compromises had to be made there, too), but the glove for my shield hand was a welder’s glove. Practical but ugly.
I had a todo for „new shield glove“ since at least April 2016, but I didn’t quite get around to it. This weekend, after making a practice piece from artificial leather, I went for the real thing. I took some pictures to illustrate the process.
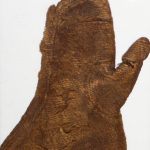
Colour photograph of the Akranes mitten by dolbex, licensed under Creative Commons.
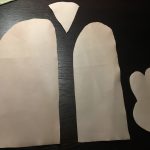
First, I took the pattern from Susanna Broomé’s booklet „Smaller garments“ (more information can be found on Susanna’s web site) and copied it to printer paper. I went for the biggest size (9) although the pattern looked huge to me.
The pattern is after mittens from wool, specifically from vaðmál, found in Akranes, Iceland, and dated to the original „landnam“ (land taking) period in the 9th to 10th century. More information can be found on the Medieval-Baltic web site. It should be noted that the pattern of this glove is almost identical to the glove I have sewn, so this mitten was definitely not a conjectural pattern.
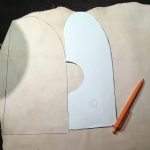
Outlining the pattern for the Akranes mittens on leather. Note that the piece in white is about to be outlined incorrectly.
I had sourced a skin of goat a year ago, precisely for this (and a couple of other) endeavour. I copied the pattern onto the flesh side of the leather and promptly made a mistake. Instead of turning the pattern so that I would have a left glove, I copied the left upper side, but the right thumb and right bottom side for the mitten onto the leather. I would notice that later. There’s also a gusset but that’s kinda irrelevant because it’s symmetrical. You can also see that the left piece is substantially bigger than the right piece – this is deliberate and even necessary to allow the hand’s curvature to be followed by the fabric (or leather). It makes sewing just a little more difficult, though.
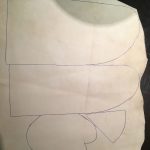
After the outlines had been copied to the leather, I used a scissors (no, not my fabric scissors) to cut out all the pieces. The two pictures below show the pieces on the leather and the cut pieces laid out on my desk.
The outlines on the leather. Neatly stuck together, but can you spot the second mistake?
Cut pieces laid out – something’s wrong here…
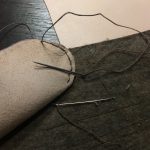
Sewing the thumb of the Akranes mitten
Now I went to start sewing. With my first leather pieces, making the holes evenly spaced used to be a big issue, but I can fairly well do that manually now. So I started with the thumb and sewed it together, good side on good side. I’m using a modern leather needle and one of the needles I bought from Medievalcraft (link goes to their needle section in case you are in need) in Hedeby last summer. It’s rather thick but very sturdy.
After that, I sewed the thumb to the inside of the glove and tried it on, inside out. Wait a second. If this fits on my left hand while being inside out, it’s… the wrong glove. Halfway finished right mitten, welcome to my „sod off, I’ll finish you some other time“ box.
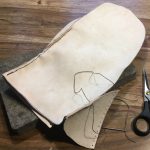
Sewing the gusset to the mitten
I re-cut the inside of a left mitten (and managed to cut out the thumb the wrong way… again!), and re-started the whole sewing process. After a while, and two or three episodes of „Peaky Blinders“, I was at the point where I would fix the gusset to the mitten inside and outside. This is a straightforward process – in case you are unfamiliar with how to fix gussets, there’s even a hint in Susanna’s sewing techniques booklet.
After that, I started sewing together the inside and the outside of the glove. This is, again, a little tricky because the outside is so much bigger than the inside. Susanna’s booklet recommends to sew a helping thread (a gathering thread) that allows to pull the outside a little together so it fits over the inside and can be sewn.
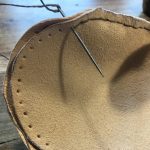
Joining the top and bottom of the mitten.
I found that for leather, this is not actually necessary. All that is necessary is to take good care that the holes punched in the upper (or outside) are exactly the same amount as the lower (the inside), only slightly further apart. It helped me to divide the glove into two or three parts – the upper straight line, the curve at the fingertips, and the lower straight line. Then, painstakingly count your holes, and if in doubt, mark and divide further. You can’t be precise enough here, it really pays off. When sewing, you will note that the whole glove starts curving, becoming convex. This is due to the lower part taking on the form of the upper which pulls on it.
I sewed and punched and sewed – actually quite meditative work which I did this morning, while watching the kids after breakfast. Eventually, I was done and took my oldest son to a bathroom sink. It was turning time!
Similar to turnshoes, these gloves are best turned when soaked in warm water. The water makes the leather soft, and getting the curves, and especially the thumb, folded out well, gets easier. However, the moisture poses a danger to the leather – it tends to get very hard when drying. Dry slowly (my glove rested on the heating, cushioned by a towel, for the whole day)!

Akranes leather mitten – Inner side after turning
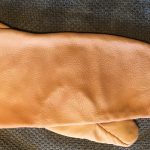
Akranes leather mitten –
Outer side after turning
After the mitten was dry, I used beeswax paste to give it a nice finish and soften it up again. Then I tried it on – and it fits like it should, not too loose and the thumb is the right size too.
Another winter project done!